In today’s fast-moving world, staying connected with friends, family, or colleagues is more important than ever. Group texting on Android devices offers a convenient way to keep everyone in the loop with just a few taps. Whether you’re coordinating a weekend getaway, managing a work project, or simply sharing daily updates, creating a group text can streamline your communication and save precious time. In the following guide, we will walk you through the simple steps of starting a new group chat and personalizing it with a unique name, ensuring that your group messaging experience is both efficient and enjoyable.
Solution 1: Using Android’s Default Messaging App
Introduction
In today’s digital age, group texts have become an essential form of communication, allowing multiple people to converse in a single thread. If you’re using an Android device, you likely have a default messaging app that came pre-installed on your phone. This native app is designed to be user-friendly, offering the basic features needed to send and receive SMS and MMS messages. One of these features is the ability to create group texts, which can be especially convenient for coordinating with family, friends, or colleagues. Naming a group text is crucial as it helps identify the conversation and keeps your messaging organized. In this section, we will walk you through the steps for creating and naming a group text using your Android phone’s default messaging app.
Steps
- Open Your Default Messaging App: Tap on the messaging app icon on your home screen or app drawer. This is typically named “Messages” or “Messaging” and has an icon resembling an envelope or speech bubble.
- Start a New Message: In the messaging app, you will usually see a “+” sign, a pencil icon, or a “New Message” button. Tap on this to start composing a new message.
- Add Recipients: You’ll be presented with a field to add recipients. Here, you can type in phone numbers or names to select contacts from your address book. For a group text, you need to add multiple recipients.
- Compose Your Message: Once you have added the desired contacts, you can type your initial message in the text field provided. This message will be sent to all recipients you’ve chosen.
- Send the Group Text: After typing your message, press the send button (usually depicted by a paper airplane icon). This will send the message to all selected recipients and automatically create a group thread.
- Name Your Group: Open the group conversation that you’ve just created. Look for a “More” button (often displayed as three dots or lines) or a “Details” button within the conversation. Tapping on this should reveal group settings or options.
- Enter the Group Name: In the settings or options menu, find the field to add or change the group name. Type in your desired name for the group text. Keep it descriptive and concise, so it’s easily recognizable.
- Save the Group Name: Ensure you save the changes you’ve made. There should be a “Done” or “Save” button to confirm the new group name.
Summary
Creating and naming a group text using your Android’s default messaging app is a straightforward process that can significantly improve your communication experience with multiple contacts. It simplifies staying in touch with friends, family, or co-workers by enabling simultaneous messages to be sent to and received from a group of people.
The benefits of using the native app include convenience since it is already installed and integrated with your phone’s contact list, and there’s no need for you and your contacts to download an additional app. The process is simple enough even for those who are not technologically savvy.
However, there are possible downsides. For instance, the default messaging app might have limitations on customization and features compared to some third-party apps. Moreover, participants in the group text will need to have MMS (Multimedia Messaging Service) enabled to participate in multimedia group messages, which could incur additional carrier fees if their plan doesn’t include unlimited MMS. Despite these potential drawbacks, for many users, the default messaging app meets all the basic needs for maintaining effective and organized group communication.
Solution 2: Through Google Messages
Introduction:
Google Messages is the official messaging app from Google designed for Android devices. With its clean and user-friendly interface, Google Messages stands out as a simple yet powerful tool for managing SMS, MMS, and group text messages. One of the app’s compelling features is the ability to create named group text conversations, which allows users to stay organized and keep track of their group interactions. This particular feature is significantly beneficial when coordinating with family, friends, or co-workers, ensuring that everyone stays on the same page. It is also integrated with other Google services and supports rich communication services (RCS), which enhances the texting experience with features like read receipts, typing indicators, and high-quality media sharing, depending on carrier availability.
Steps:
- Install Google Messages: If not already installed, download and install the Google Messages app from the Google Play Store. Search for ‘Messages’ by Google LLC, and tap “Install.”
- Set Google Messages as your default SMS app: Open the Google Messages app, and if prompted, set it as your default messaging app to manage your text messages.
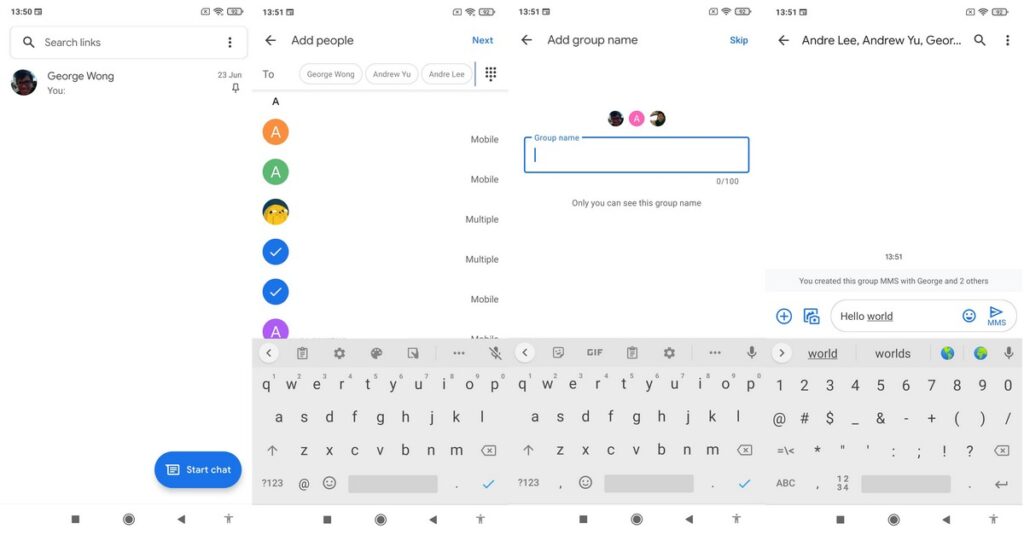
- Start a new conversation: On the main screen of Google Messages, tap the pencil icon to start a new conversation.
- Select recipients for your group text: In the ‘To:’ field, start typing the names or numbers of the contacts you wish to add to the group. As you type, suggestions will appear. Tap on the contacts you want to include.
- Send your first group message: Once all participants are added, type your message in the text field at the bottom. Then, tap the send icon to dispatch your message. The recipients will receive this as a group text.
- Name your group chat: After sending your first message, tap the three dots in the top right corner of the group conversation. From the drop-down menu, select ‘Group details.’
- Now, you will see an option to add or change the group name. Tap on ‘Group name,’ and enter your desired name for the group conversation.
- Save the group name: After typing in the name, tap ‘OK’ or ‘Save’ to confirm. Your newly named group text will now display this name at the top of the conversation and in your chat list.
Summary:
Creating and naming a group text in Google Messages is a straightforward process that allows for efficient communication with multiple people at once. The benefit of using Google Messages lies in its integration with Android and other Google services, offering a seamless experience and additional features when compared to standard SMS text messaging. It is especially useful for keeping conversations organized and for distinguishing between numerous group interactions.
However, potential downsides include the necessity for all group members to use the app to experience all of its features fully, and some advanced features depend on carrier support and may not be available in all regions or with all service providers. Despite these points, for most users, Google Messages provides a robust and user-friendly platform for managing group texts on Android devices.
Solution 3: WhatsApp Group Chat
Introduction
WhatsApp is one of the most popular messaging platforms around the globe. It’s known for its easy-to-use interface, reliability, and broad set of features. One key feature is the ability to create group chats, which can include up to 256 participants. This makes it an ideal tool for staying connected with friends, family, or colleagues. In WhatsApp, users can not only name their groups but also customize notifications, and share various types of media, such as photos, videos, and documents.
One of the most significant advantages of WhatsApp Group Chats is that it works across different platforms and devices, including Android. It uses your phone’s internet connection to send messages, so you can avoid SMS fees. Additionally, it offers end-to-end encryption for security. For Android users who need to keep in touch with a collection of individuals, this guide will detail the steps to create and name a group chat on WhatsApp.
Steps
- Install WhatsApp: If you haven’t already, download and install WhatsApp from the Google Play Store. Ensure it’s set up with your phone number.
- Open WhatsApp: Tap on the green WhatsApp icon on your home screen or app drawer to launch the app.
- Navigate to Chats: In WhatsApp, the default screen is the “Chats” screen. If you aren’t already there, tap on the “Chats” tab.
- Create a New Group: Tap the “New Chat” icon, which can be found as a chat bubble with a pen in the bottom-right corner of the screen. Then, select the “New Group” option.
- Add Group Participants: You will see a list of your contacts who use WhatsApp. Tap on the names of the people you want to add to the group. Once selected, they will appear at the top of your screen. When you have finished adding members, tap the green arrow.
- Name Your Group: After selecting group participants, you’ll be prompted to name your group. There is a 25-character limit for group names. Choose a name that reflects the purpose of the chat, and then tap the green checkmark.
- Set a Group Icon: Optionally, you can set an image as the group icon by tapping on the camera icon. You can take a new photo, choose from your gallery, or search the web for an image. After setting the icon, tap “Next”.
- Customize Group Settings: You can further customize your group by adding a group description, sending messages only from admins, and editing group privacy settings. You access these options through the group info screen.
- Send Your First Message: Type your first message into the message box at the bottom of the screen and hit send. Congratulations, your group is now active!
Summary
Creating a WhatsApp group chat on Android allows you to efficiently communicate with multiple contacts at once. It’s a simple process that brings with it the benefit of group cohesion and the ability to share information quickly across different types of media. The ability to name the group helps maintain order and clarity, especially when managing multiple groups.
A potential downside could be managing the flow of messages if the group becomes very active, which can be overwhelming for some users. Also, all group members can see each other’s phone numbers, which might be a privacy concern in certain scenarios. However, WhatsApp’s encryption and privacy settings can help to alleviate some of these concerns. Overall, WhatsApp Group Chat remains a powerful, user-friendly solution for Android users to create and maintain group conversations.
Solution 4: Facebook Messenger Groups
Introduction
In a world where staying connected with friends and family is paramount, group chats have become an essential communication tool. Facebook Messenger is a widely used application that allows users to send messages, share photos and videos, and make voice and video calls. One of its key features is the ability to create group chats, which is particularly useful for organizing events, managing projects, or simply staying in touch with a circle of friends. This guide details the process of creating and naming a group text on Facebook Messenger for Android, catering to users who may not be tech-savvy. It includes simple, concise steps to ensure a smooth experience in establishing your group.
Steps
- Install Facebook Messenger: If you haven’t already, download and install Facebook Messenger from the Google Play Store on your Android device.
- Open the App and Log In: Launch the Facebook Messenger app. Log in using your Facebook credentials if you’re not logged in already.
- Create a New Group: Tap on the pencil icon at the top-right corner of the screen, which is for composing a new message. From the options that appear, select “Create a New Group.”
- Select Group Participants: Your contact list will appear. Scroll through or search to select the friends you wish to add to the group. Each selected contact will be highlighted. Once you’ve chosen all your group members, tap on “Next.”
- Name Your Group: After selecting participants, you will be prompted to type in a name for your new group. Choose a name that represents the purpose of your group or something that all members will recognize. Enter the name in the designated field.
- Customize Your Group: You can add a group photo by tapping on the camera or gallery icon. This image will appear as the group’s avatar. Additionally, you can set group colors, emojis, and nicknames by tapping on the ‘Edit’ button in the top right of the group information screen.
- Start Messaging: With your group named and participants added, you can begin the conversation. Type your message into the text field at the bottom, attach images or videos if you wish, and press the send button.
- Managing the Group: As the group creator, you can manage the group by adding or removing members, changing the group name, or leaving the group if necessary. These options are available in the group settings, which you can access by tapping the group name at the top of the chat.
Summary
Creating and naming a group text on Facebook Messenger brings many benefits, including easy communication with multiple people simultaneously, sharing files and media, and creating a space for collaborative discussions. The process is designed to be intuitive, so even those with little technical knowledge can successfully create a group.
However, it’s worth noting the potential downsides. All group members need to have a Facebook account to participate, which might not be ideal for everyone. Privacy can also be a concern for some users, given that conversations on Facebook Messenger aren’t end-to-end encrypted. Despite these concerns, for those already using Facebook Messenger, its group chat feature is a convenient way to stay in touch with multiple contacts in an organized manner.
Solution 5: Telegram Groups
Introduction
Telegram is a widely-used messaging application known for its strong focus on security and speed. One of the main features that make Telegram stand out is its comprehensive group chat functionality. Unlike some other messaging apps, Telegram allows users to create large groups wherein each group can hold up to 200,000 members, making it exceptional for a wide range of uses—from small friend groups to large communities. The process of creating and naming your group on Telegram is simple, yet offers a rich set of features like multimedia sharing, polls, and more. In this solution, we will guide you step by step on how to create and name a group text on Android using Telegram.
Steps
- Install Telegram: If you haven’t already, download Telegram from the Google Play Store and go through the setup process, including verifying your phone number.
- Open the App: Launch Telegram by tapping on its icon on your home screen or app drawer.
- Start a New Group: Tap on the pencil icon located at the bottom right corner of the screen, which is the “New Message” button. Then, select “New Group” from the menu that appears.
- Add Contacts: You will be prompted to add contacts to your group. Select contacts from your list by tapping on their names. Once you’ve selected all the desired participants, tap the arrow or ‘Next’ button (usually located at the top right corner of the screen).
- Name Your Group: After selecting the members, you’ll be prompted to enter a name for your group. Choose a name that reflects the purpose of the group or something that all members can easily recognize.
- Set Up a Group Photo: Although optional, you can set a group photo by tapping the camera icon. This helps in visually identifying your group. You can take a new photo or choose one from your gallery.
- Create the Group: Once you’ve set the name (and optionally, the photo), press the checkmark or the ‘Create’ button, which might be located at the bottom right or the top right of the screen, depending on your device and the version of Telegram you are using.
- Adjust Group Settings: After creation, you can adjust settings by tapping the group name at the top of the chat screen, where you can manage members, set permissions, and more.
- Start Messaging: You can now begin messaging in the group. The text box at the bottom of the screen is where you type your messages. Press ‘Send’ or the arrow icon to send your message to the group.
Summary
By following these straightforward steps, you’ve created a group text on Telegram, designed for both small-scale and large community interactions. The benefits of using Telegram for group chats include the ability to handle a large number of participants, robust security features, and a user-friendly interface that makes the app accessible for both technical and non-technical users.
However, potential downsides may include the need for all members to have Telegram installed, which might be a barrier if they’re accustomed to using other messaging apps. Additionally, managing a very large group requires careful setting of permissions and rules to ensure a smooth conversation flow and a good user experience for all members. Despite these considerations, Telegram groups remain a highly efficient way to communicate with multiple contacts simultaneously and offer a wealth of features that are bound to enhance your group chat experience.
Solution 6: Signal Private Groups
Introduction
In a world where privacy concerns are growing, Signal offers a secure way to communicate with friends, family, and colleagues through group texts. Signal is known for its strong encryption standards, meaning that all messages are protected and can only be seen by the members of the group. If you are concerned about your digital privacy and security, setting up a group on Signal is an excellent choice. Beyond security, Signal allows you to create named groups, which makes organizing conversations and keeping in touch with multiple people hassle-free.
Steps
Step 1: Install Signal
- Download Signal: Before anything else, install the Signal Private Messenger app from the Google Play Store. You’ll need a stable internet connection to download it.
- Open the app: Once installed, open the Signal app.
- Register: Follow the on-screen prompts to register with your phone number. Signal will send you a verification code via SMS to complete your registration.
Step 2: Create a New Group
- Tap on the pencil icon: On the main screen of the Signal app, you will see a pencil icon. Tap on it to start a new message.
- Select “New Group”: After tapping the pencil icon, choose ‘New Group’ from the options that appear.
Step 3: Add Group Members
- Choose contacts to add: Your contact list will be displayed. Select the contacts you want to add to your group by tapping on their names.
- Confirm members: Once you’ve selected all the desired contacts, tap on the arrow or “Next” to proceed.
Step 4: Name Your Group
- Enter a group name: You will be prompted to enter a name for your new group. Choose a name that is recognizable and relevant to the group’s purpose.
- Add a group photo (optional): You can also add a group icon by tapping on the camera icon. This is optional but helps to visually distinguish your group.
Step 5: Set up Group Preferences
- Adjusting settings (optional): Before finalizing the group, you can adjust several settings like disabling notifications, or setting up group admin permissions. Customize these according to your preferences.
- Create the group: After naming your group and adjusting settings, tap on the checkmark or “Create” to establish your group.
Step 6: Start Messaging
- Send a message: With your group now created, you can start sending messages. Type your message in the text box and tap send.
- Use additional features: Explore the features Signal offers, like voice messages, photos, and file sharing, to optimize your group chat experience.
Summary
Creating a group text on Signal is a straightforward process that offers the added benefit of end-to-end encryption, ensuring your communication remains private. The ability to name your group helps in managing multiple chats efficiently, and customization options allow for tailored notification settings. However, it’s important to note that all group members need to have Signal installed on their devices, which can be a minor inconvenience compared to conventional SMS text groups. Despite this, the heightened security features and intuitive interface make Signal an excellent choice for those prioritizing privacy and ease of use in their group communications.
Solution 7: Viber Communities
Introduction
Viber is much more than a simple messaging app; it has a feature called “Viber Communities” which allows you to create large group chats or communities with unlimited members. It’s a perfect solution for those who want to gather people with common interests, organize events, or simply stay in touch with a large group of friends or family. Unlike standard group chats, Viber Communities provide more control and features like assigning roles to members, featuring links, and pinning important messages. Naming your group helps in identifying it and fostering a sense of belonging among the members. Let’s walk you through the process of creating and naming your own Viber Community.
Steps
- Download and Install Viber: Firstly, download Viber from the Google Play Store. If you already have it, ensure it’s updated to the latest version to access all the features.
- Create an Account or Log In: Once installed, open the app and either log in with your existing Viber account or create a new one by verifying your phone number.
- Access Communities: Tap on the “Communities” tab usually found on the app’s main screen. This section can also be accessed through the Viber menu.
- Start Your Own Community: Look for a button or link that says “Create a Community” or has a “+” symbol. It’s typically at the top of the screen or in the lower-right corner.
- Choose Your Community Name: Enter a name for your group when prompted. Choose a name that is descriptive and clear to all potential members. This could be related to a shared interest, a particular purpose for the group, or any identifying theme.
- Set Up Your Community: Follow the guided process to add a group photo, which will serve as the community’s avatar, and write a description that captures the essence of the group. You may also set up initial rules or information for new members here.
- Add Members: You can add members to your new community by selecting contacts from your phone or by sharing a link to your community for others to join. As you’re the creator, you will automatically be assigned as the Community Admin.
- Manage Community Settings: As an admin, you can adjust settings, such as who can post or invite new members. It ensures your community remains organized and focused on its purpose.
- Regularly Engage with the Community: Start conversations, share relevant content, and engage with members. The success of a community often hinges on active participation and good moderation.
Summary
Using Viber Communities to create and name a group text can significantly enhance your group interaction experience. It offers advanced features and flexibility that typical group texts do not provide, like unlimited members and enhanced administrative control. This is particularly beneficial for larger groups or when managing community-based engagements. One potential downside could be that all members need to have the Viber app, which may not be as universally adopted as some other messaging platforms. Nevertheless, with its rich feature set and intuitive interface, creating a Viber Community can be a compelling choice for those looking to foster group communication and collaboration.
Solution 8: GroupMe
Introduction
GroupMe is a dedicated group messaging app that is a part of Microsoft’s suite of products. Designed with simplicity in mind, GroupMe facilitates seamless communication among friends, family, colleagues, or any group of people. It stands out for its ease of use and is particularly useful for those who want to chat with groups without fuss. What makes GroupMe convenient is its ability to work on smartphones, tablets, and computers, ensuring you can stay in touch no matter the device you’re using.
This platform allows users to create named group texts, share photos, videos, and documents, and even like messages. GroupMe also supports direct messaging, for when you need to have a conversation outside of the group. Another appealing aspect is that it can work via SMS so that participants can join in on the conversation even if they do not have the app installed.
For someone who isn’t tech-savvy, GroupMe could be an excellent choice for creating a group text because of its straightforward interface and minimalistic features. Now let’s take you through the simple steps of creating and naming a group text on GroupMe.
Steps
- Download and Install GroupMe:
- Firstly, download the GroupMe app from the Google Play Store on your Android device.
- Once installed, open the app and sign up or log in if you already have an account.
- Starting a New Group:
- On the home screen, you’ll see a chat bubble icon with a ‘+’ symbol; tap on it to start a new group.
- This action will take you to the ‘New Group’ page.
- Naming Your Group:
- You’ll find a field labeled ‘Group Name’ at the top of the ‘New Group’ page.
- Enter the desired name for your group text here. This name will be visible to all the participants of the group.
- Adding Participants:
- Below the group name field, there’s a section called ‘Add Members.’ Here, you can add people from your contacts or by typing in phone numbers or email addresses.
- As you add members, they’ll appear in a list within this section so you can review who’s being included.
- Customizing the Group (Optional):
- You can choose an avatar for the group by tapping on the camera icon.
- The avatar can be any image that represents the group, such as a picture of all members, a logo, or any other visual identifier.
- Creating the Group:
- Once you’ve named your group and added members, tap on the checkmark located in the top right corner of the screen.
- Your group is now created and members will receive an invite to join the group chat.
- Engaging in the Group Chat:
- To send a message, type in the bar at the bottom of the screen where it says ‘Type a message.’
- Hit send to share your message with the group. You can also share photos, videos, and links in a similar manner.
Summary
Using GroupMe to create and name a group text is an excellent option for those seeking a user-friendly messaging experience. Its strong suit is in its straightforward process – from setting up the group, naming it, adding members, to finally communicating. The advantage here lies in the simplicity of engagement and the lack of a need for technical knowledge.
On the downside, participants would need to download the app or agree to get messages via SMS to be involved in the conversations, which might not suit everyone’s preference. Despite this, GroupMe remains a versatile choice for Android users looking for an uncomplicated way to manage group conversations.
Solution 9: WeChat Group Chat
Introduction
For those living in regions where WeChat is a popular choice for communication, like many parts of Asia, using WeChat for group texts can be not only convenient but also loaded with features that might not be available in other messaging applications. WeChat is a comprehensive messaging and social media app that enables users to connect with friends, family, and colleagues through messages, voice calls, and video calls. In this guide, we will discuss how to create and name a group text within WeChat, which is perfect for organizing your contacts into manageable conversations, making it easier to stay in touch with everyone at once.
Steps
- Download and Install WeChat:
If you haven’t already, download WeChat from the Google Play Store and follow the installation instructions. Once installed, open the app and sign in or create a new account. - Initiate a New Group Chat:
On the main screen, go to the ‘Chats’ tab and tap the ‘+’ icon or the menu button located on the top right corner of the screen. Select ‘New Chat’ from the dropdown menu. - Select Group Chat Members:
Now you will see your contacts list. Scroll through or search to select the contacts you wish to add to your group chat. Once you have selected all the contacts, tap ‘OK’ or the checkmark in the bottom right corner to continue. - Set Up Group Chat Identity:
After selecting members, you’ll be taken to the group chat screen. Here, tap on the name of the group at the top of the screen or on the ‘…’ on the top right corner to access group settings. - Name Your Group:
In the group settings, look for the ‘Group Name’ option or ‘Set Group Name’. Here you can type in the desired name for your group chat. Once you’ve entered the name, confirm by tapping ‘Save’ or ‘OK’. - Customize Group Settings (Optional):
While in the group settings, you may want to explore additional options such as group notices, group albums, or manage members. Customize these settings to your preference. - Start Chatting:
Return to the group chat window by tapping the back button. You can now start sending messages to the group. The conversation will be updated in real-time, and everyone in the group can participate.
Summary
Creating and naming a group chat in WeChat is a simple process that makes it easier to communicate with multiple contacts simultaneously. The benefits of using WeChat include its wide range of features like message recall, voice and video calls, and the ability to share multimedia. This is particularly useful for staying in touch with friends and family or for work-related communications within regions where WeChat is prevalent. However, one potential downside is that not everyone may use WeChat, particularly in regions where other messaging apps are more dominant. Moreover, newcomers to the app might find its myriad of features somewhat overwhelming to navigate at first. In summary, WeChat group chats are a powerful feature for users within the app’s extensive network to connect and communicate effectively.
Solution 10: Textra SMS Groups
Introduction
Textra SMS is a highly customizable third-party messaging application for Android devices. It offers a range of features, including group messaging capabilities. Creating a group text in Textra SMS is a straightforward process that allows you to communicate with multiple contacts simultaneously. The app also lets you assign a specific name to each group, making it easier to manage and identify conversations among various text threads. This added level of organization can be particularly useful for coordinating plans, discussions, or staying connected with family and friends. In this guide, we’ll walk you through the process of creating and naming a group text using Textra SMS.
Steps
- Download and Install Textra SMS:
- Open the Google Play Store on your Android device.
- In the search bar, type “Textra SMS” and search.
- Find Textra SMS in the search results and click “Install.”
- Once installed, open the app.
- Set Textra as Default Messaging App (optional but recommended):
- When you first open Textra SMS, it may prompt you to set it as your default messaging app.
- Follow the on-screen instructions to set Textra as the default.
- Create a New Message:
- Tap the messaging icon (usually looks like a pencil or plus sign) to start a new message.
- Select Contacts for Group:
- Type the names or numbers of the contacts you want to include in the group text in the “To:” field.
- As you type, Textra will suggest contacts from your address book. Tap on the correct names to add them to your group.
- Send Initial Group Message:
- Once you’ve selected all your contacts, type out your initial message in the text input area.
- Press the send icon (often depicted as a paper airplane or “send”button) to send your message. This will create a group message thread with the selected participants.
- Name Your Group:
- Within the new group message thread, tap the three-dot menu icon at the top-right corner of the screen.
- Select “Group Details” or a similarly titled option from the drop-down menu.
- You will see an option to “Add Subject” or “Change Group Name.” Tap it.
- Enter the desired name for your group text and hit ‘OK’ or ‘Done’.
- Customize Group Settings (optional):
- You can also customize notification sounds, bubble colors, and other settings for the group within the “Group Details” menu.
- Adjust these settings to your preference, if desired.
- Manage Group Members:
- In the same “Group Details” menu, you can add more participants by tapping “Add Member” or remove members by tapping on their name and selecting “Remove from Group.”
Summary
By following these steps, you have successfully created a group text and assigned it a name in Textra SMS. Having a named group chat is beneficial because it helps you quickly distinguish it from other conversations in your message list. This is especially important when managing multiple group chats, as it keeps communication organized.
The benefits of using Textra SMS for group messaging include its customization options, which can make your messaging experience more personal and visually distinctive. The potential downsides are that not all recipients may use Textra SMS, which might lead to a non-uniform experience if various default apps interpret group settings and messages differently. Additionally, using a third-party app for messaging will often come with a learning curve for those who are accustomed to their native Android messaging app.
Regardless, Textra SMS is a powerful and user-friendly option for those looking to enhance their group messaging on Android with additional features and customization.
Conclusion
By following the straightforward steps outlined, you’ve successfully created and named a group text on your Android device, opening up a world of convenient communication with friends, family, or colleagues. Remember, the exact steps might vary slightly depending on your Android version or messaging app, but the essentials remain the same. Now, you’re ready to stay connected with your group, share important updates, or plan events with ease.
FAQs
Q: How do I add new members to an existing group text?
A: Open the group text, tap the three dots for more options, select ‘Group details’ or ‘Add people,’ and then choose the contacts to add.
Q: Can I name a group text with participants using different types of phones?
A: Yes, most messaging apps allow you to name a group regardless of the devices participants are using, but everyone needs to be using the same app that supports group texts.
Q: What should I do if I can’t create a group text on my Android phone?
A: Ensure your messaging app is updated to the latest version. If issues persist, check your app’s permissions or consider using an alternative messaging app that supports group texting.