Welcome to your go-to guide for diving into the exciting world of Blizzard Entertainment games! Whether you’re a seasoned gamer or just starting, this step-by-step guide is designed to help you easily navigate the process of downloading your favorite Blizzard games. From the epic realms of “World of Warcraft” to the futuristic battles of “Overwatch,” we’ve got you covered. We’ll walk you through everything from setting up your account to pressing “play,” ensuring a hassle-free journey to the heart of the action. Let’s get started on your gaming adventure!
Solution 1: Use the Battle.net Desktop App
Introduction
For many gamers, especially fans of Blizzard Entertainment titles such as World of Warcraft, Overwatch, and Diablo, downloading and playing these games is a central part of their entertainment experience. Blizzard has created a one-stop-shop for accessing their games: the Battle.net Desktop App. This comprehensive platform not only allows you to download and play games but also serves as a hub for game updates, social networking with fellow players, and access to Blizzard’s online store.
The Battle.net Desktop App is designed to be user-friendly, providing a seamless interface that guides you through the process of managing your games. From initial setup to your first game download, Blizzard has aimed to make the process as intuitive as possible. Below, you’ll find detailed steps on how to use the Battle.net Desktop App to download Blizzard games.
Steps
- Download the App:
- Visit the official Blizzard website at battle.net.
- Locate and click on the ‘Download’ link for the Battle.net Desktop App.
- Choose the download that corresponds to your operating system (Windows or Mac).
- Save the installation file to your computer.
- Install the App:
- Navigate to the downloaded installation file.
- Double-click the file to begin the installation process.
- Follow the on-screen instructions to install the app on your computer.
- Launch the Battle.net Desktop App once the installation is complete.
- Create or Log in to Your Blizzard Account:
- If you already have a Blizzard account, enter your account credentials (email and password) to log in.
- If you don’t have an account, you can create one by clicking on the ‘Create a Free Blizzard Account’ button and following the instructions provided.
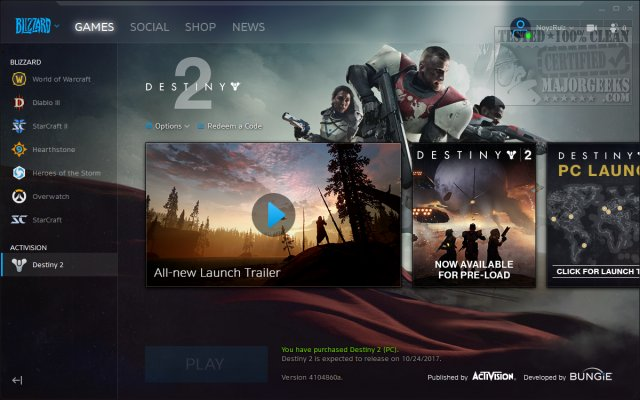
- Browse the Blizzard Library:
- Once logged in, you’ll see a list of Blizzard games.
- Browse through the library and find the game you want to download.
- If you haven’t purchased the game yet, you’ll be given the option to buy it. If it’s a free-to-play game, or you already own it, you’ll have the option to download it directly.
- Download the Game:
- Click on the game you wish to download.
- Click the ‘Install’ button to begin the download process.
- Select the desired installation location on your computer.
- The app will display the download progress. You can pause and resume the download as needed.
- Launch and Update Your Game (If Necessary):
- After the download is complete, click the ‘Play’ button to start the game.
- If an update is required, the Battle.net Desktop App will automatically download and apply it before the game launches.
Summary
Using the Battle.net Desktop App to download Blizzard games offers a streamlined, reliable, and secure method of game management. This app ensures that games are kept up to date with the latest patches and expansions, and integrates social features that enhance the gaming experience. Additionally, the app offers an easy-to-navigate storefront for purchasing new games or in-game items.
The benefits of using the Battle.net Desktop App include convenience, automated updates, direct support from Blizzard, and a centralized platform for all your Blizzard games. However, one potential downside is that it requires an initial download and installation of the app itself, and some users may prefer not to have additional software on their computers. Furthermore, it is essential to keep login details secure as the app gives access to your entire Blizzard game library.
Solution 2: Official Blizzard Website
Introduction:
In order to download games created by Blizzard Entertainment, you have the option of using the Official Blizzard Website. This method is particularly useful for those who prefer to purchase and manage games directly from the source without having to navigate through supplementary software initially. In this guide, we will explore how the Official Blizzard Website can serve as your portal to access Blizzard’s extensive library, allowing you to buy games and, in conjunction with the Battle.net app, begin the download process. This approach ensures that you are dealing directly with Blizzard, which can provide peace of mind in terms of security and support.
Steps:
- Open your preferred web browser on your computer.
- Navigate to the official Blizzard website, which can be found at
https://www.blizzard.com. - If you have an existing Blizzard account, click on the
Log Inbutton usually located at the top-right corner of the page and enter your Blizzard account details. If you do not yet have an account, you will need to create one by clicking on theCreate a Free Accountbutton and following the on-screen instructions to set up a new account. - Once logged in, browse through the website to find the game you wish to purchase. The Blizzard website typically has a menu for games where you can select your desired game.
- After selecting the game, you will be directed to the game’s detailed page where you will see purchase options, including different editions if they are available.
- Choose the edition you want and click on the
Buy Nowbutton. - You will be prompted to confirm your purchase decision, enter payment information, and finalize the transaction by following the website’s purchasing process.
- Upon successful purchase, you will typically receive a confirmation email, and the game will be added to your Blizzard account.
- To download your purchased game, you now need the Battle.net desktop application. If it’s not already installed, look for a link usually provided on the game’s purchase confirmation page or in the confirmation email to download the Battle.net app.
- Install the Battle.net app by running the downloaded installer and following the installation prompts.
- Open the Battle.net app once installed, log in with your Blizzard account details, and you will see your purchased game listed in the app.
- Click on the game within the Battle.net app, and press the
Installbutton to initiate the download and installation process, which the app will guide you through.
Summary:
Using the Official Blizzard Website to purchase and download games is a straightforward process. This method offers the benefit of having all your transactions and game library in one secure place, with the direct support of Blizzard Entertainment. The key advantage of this method is that it simplifies the purchase process, while also ensuring that you’re buying a legitimate copy of the game and that any payment information is securely handled.
One potential downside, however, is that after purchasing the game through the website, you’ll still need to download and use the Battle.net desktop application to download and play the game. This adds an extra step for those who might have preferred a direct download option without the need for an additional app. Nonetheless, for those looking to secure their purchases directly from the source, this option is ideal in combining the convenience of online shopping with the assurance of Blizzard’s direct support and service.
Solution 3: Third-Party Key Retailers
Introduction:
Purchasing Blizzard games through third-party key retailers is a less commonly known but equally valid method for game acquisition. Authorized third-party retailers are businesses that have obtained permission from Blizzard to sell digital copies of their games in the form of keys or codes. These keys can then be redeemed on Blizzard’s Battle.net platform to add the game to your library and download it to your computer.
Steps:
- Research Authorized Retailers: Start by identifying authorized third-party retailers. It’s crucial to only purchase from reputable sources to ensure that you receive a valid game key and to protect your personal and financial information. You can usually find a list of authorized retailers on the Blizzard website or through a quick internet search.
- Purchase the Game Key: Once you’ve selected a retailer, you can browse their website to find the game you wish to purchase. After making your selection, proceed to the checkout and purchase the game key. Make sure to save the game key code that is provided after purchase; this is what you’ll use to redeem the game on Battle.net.
- Create a Battle.net Account: If you don’t already have one, you need to create a Battle.net account. Go to the Battle.net website, click on ‘Create an Account,’ and follow the prompts. You’ll need to provide some basic information and verify your email address.
- Download the Battle.net App: If you haven’t already, download the Battle.net desktop application from the Blizzard website. Install the application by following the on-screen instructions.
- Redeem the Game Key: Open the Battle.net app and log in with your account details. Click on the ‘Blizzard’ logo in the upper left corner and select ‘Redeem a Code’ from the dropdown menu. Enter your game key code when prompted, and then click ‘Redeem Code’.
- Download Your Game: Once the game is added to your Battle.net account, it will appear in your game library. Select the game from the list, and you will see an option to install it. Choose your desired install location if prompted, and then click ‘Start Install’.
- Wait for the Download to Complete: The time it takes to download the game will depend on the size of the game and the speed of your internet connection. You can monitor the progress directly within the Battle.net app.
- Install the Game: After the download is finished, the game installer will automatically launch. Follow any additional on-screen prompts to complete the installation.
- Play the Game: Once installed, you can play the game by clicking ‘Play’ from within the Battle.net application or by finding the game’s shortcut on your desktop.
Summary:
Buying a game key from an authorized third-party retailer can often save you money as they may offer discounts or bundled deals. However, always ensure that the retailer is authorized to avoid the risk of purchasing invalid or illegally obtained keys. Once you have your key, the redemption process on Battle.net is straightforward and secure. The primary benefits of this method are potential cost savings and the convenience of shopping around for the best deal. The downsides may include the risks associated with purchasing from unauthorized sellers and the small extra step of redeeming the code compared to direct purchases. Always keep your account details secure and enjoy your new Blizzard game!
Solution 4: Gift from a Friend
Introduction:
Receiving a gift from a friend is a wonderful experience, and it’s no different in the digital world of gaming. Blizzard Entertainment offers a feature on its Battle.net platform that allows users to gift games to their friends. This means that if you have not purchased a game yourself, but someone has generously decided to buy it for you as a gift, you can easily claim and download it on your computer. This solution is perfect for special occasions like birthdays, holidays, or simply as a surprise to brighten someone’s day. The process is integrated within the Battle.net ecosystem, ensuring that it is both secure and straightforward.
Steps:
- Receive the Gift Notification:
- Wait for an email from Blizzard Entertainment informing you that you have received a gift. This email will contain a message from your friend and a link that you can click to claim the gift.
- Claim Your Gift:
- Click on the link provided in the email. You’ll be redirected to the Battle.net website.
- If you’re not already logged in, you will be prompted to sign in to your Battle.net account. Use your email and password associated with your Blizzard account.
- Redeem the Gift:
- After logging in, you will be taken to a page that will allow you to redeem your gift. Confirm that you want to claim the gift, and it will be added to your Battle.net account library.
- Install the Battle.net App (If Necessary):
- If you haven’t already, download and install the Battle.net desktop app from Blizzard’s official website.
- Follow the instructions provided by the installation wizard to complete the setup.
- Open the Battle.net Desktop App:
- Once the Battle.net app is installed, open it by double-clicking its icon on your desktop or by finding it in your computer’s application menu.
- Navigate to the Game Library:
- Inside the Battle.net app, click on the “Games” tab to view your game library. You should see the gifted game listed there.
- Start the Game Download:
- Click on the game you have been gifted. You will be taken to the game’s page within the app.
- Press the “Install” button to begin downloading the game. You may choose the installation directory and other settings before proceeding.
- Monitor the Download Progress:
- The Battle.net app will show the progress of your game download. You can pause and resume the download if needed.
- Complete the Installation:
- Once the download is finished, the “Install” button will change to “Play”. The game is now installed on your computer and ready to be enjoyed.
Summary:
This gifting option is beneficial as it allows for a personal and thoughtful exchange between friends within the gaming community. It’s convenient, secure, and straightforward, which makes it appealing for both givers and receivers of gifts. The major benefit is that you do not need to provide any payment information or go through any purchase process, as the giver has already taken care of the financial aspect.
However, there are a few potential downsides to be aware of. Firstly, if you receive a game you already own, Blizzard’s gifting feature usually checks for this in advance, but mistakes can happen. Secondly, if the email about the gift goes to your spam folder or is otherwise missed, you may not realize you’ve been gifted a game. Lastly, you’ll need the Battle.net desktop app to download the game, which requires you to have a compatible PC or Mac.
Overall, the gifting process is a social and user-friendly way to expand your gaming library without the need for a direct purchase, making it a fantastic option for those receiving Blizzard games from friends or family.
Solution 5: Physical Retail Copy
Introduction:
In an age where digital downloads reign supreme, the charm of a physical copy remains undiminished for many gamers. Buying a physical copy of a Blizzard game not only provides the tangibility of owning a boxed product but also includes all you need to download and install your game digitally via the Battle.net desktop application. This method is excellent for those who enjoy collecting physical boxes or may have bandwidth limitations that make large downloads impractical. Now, let’s navigate through the seamless process of turning your physical copy into digital entertainment.
Steps:
- Purchase Your Physical Game:
Begin by visiting a local or online retailer and purchasing a physical copy of your desired Blizzard game. - Locate Your Game Key:
Once you have your game in hand, open the packaging carefully. Inside, you should find a card or booklet with a unique code—this is your game key. It’s a string of letters and numbers that you’ll use to claim your digital copy. - Install Battle.net App:
If you haven’t already, download and install the Battle.net desktop app from Blizzard’s official website. Follow the on-screen instructions to get the application set up on your PC or Mac. - Create or Log into Your Battle.net Account:
Open the Battle.net app and either sign in to your existing Blizzard account or create a new one. This account is essential for managing your game licenses and downloads. - Redeem Your Game Key:
With the Battle.net app open and logged in, click on the ‘Games’ tab. Look for the ‘Redeem a Code’ option, usually located in the lower-right corner or under the ‘Shop’ tab. Enter the game key from your physical copy here. - Download Your Game:
Upon successful redemption, your game will be added to your Battle.net account, and you’ll see it listed in the app. Click the game’s icon and press the ‘Install’ button to start the download process. You can choose the installation directory and manage other settings before the download commences. - Wait for Download and Installation:
Depending on your internet connection, the download may take some time. Once the download is complete, the installer will automatically begin setting up the game on your system. - Play Your Game:
When the installation finishes, click ‘Play’ to launch your new Blizzard game. The app will manage any necessary updates in the future.
Summary:
The benefit of this method is the ownership of a physical collector’s item and a straightforward way to download and install your game. Some players may also have access to special editions that offer extra goodies not available in digital versions. However, be mindful that optical drives are less common in modern computers, which might inconvenience users without one, as they would require an external drive to access disk-based content. Additionally, ensure your key has not been previously used or tampered with; always buy from reputable retailers to avoid issues with invalidated game keys. With your game successfully redeemed and installed, dive into the immersive worlds that Blizzard has to offer—all from the comfort of your home!
Solution 6: Blizzard Game Cards
Introduction
Blizzard Game Cards are a convenient way for you to add funds to your Battle.net balance without needing a credit card or bank account. They make for a perfect gift or a hassle-free method of purchasing games for those who prefer to use cash or are uncomfortable with online transactions. Using these cards is similar to using a gift card for any online store: you purchase a card with a set value, redeem it into your account, and then use the balance to buy games and other digital products. Blizzard Game Cards can be found at various retail stores, such as electronics shops, supermarkets, and even convenience stores.
Steps
- Locate a Retail Store: Head to a local retail store that stocks Blizzard Game Cards. These could range in preset denominations such as $20, $50, or other amounts.
- Purchase a Game Card: Choose the card with the denomination that suits your budget or the cost of the game you wish to purchase. Pay for the card at the register like any other item.
- Scratch Off to Reveal the Code: After purchasing the card, scratch off the protective coating on the back of the card to reveal the unique redemption code. Be careful not to scratch too hard and damage the code.
- Access the Battle.net App: On your computer, open the Battle.net Desktop App. If you haven’t already installed the app, you can download it from Blizzard’s official website.
- Log In to Your Account: Enter your Battle.net login credentials. If you don’t have an account, you will need to create one by following the account creation process.
- Redeem the Card: Click on your account name in the top-right corner of the app, then select “Add Balance” or “Redeem a Code” from the dropdown menu.
- Enter the Code: Input the redemption code from the back of your game card into the text field and click “Redeem Code”.
- Confirm Balance Top-Up: After redeeming the code, your Battle.net balance will be updated with the amount of the card. A confirmation message will typically appear, and you should also receive an email confirmation for your records.
- Purchase Your Game: Navigate through the app to find the game you wish to download. Click on it and use your now updated Battle.net balance to complete the purchase.
- Download the Game: Once the purchase is confirmed, you’ll have the option to download the game. Follow the on-screen instructions to start the download and install the game onto your computer.
Summary
Using Blizzard Game Cards provides a secure and simple way to add to your Battle.net balance and purchase games without the need for a credit card. It’s perfect for those who prefer cash transactions or are buying a game as a gift. However, remember to keep your receipt and game card until the balance is successfully added to your account, in case there are any complications during the redemption process. Also, be aware of potential downsides such as the extra trip to a store to purchase the card and the physical nature of game cards – if you lose the card before redeeming it, the funds will be irretrievable.
Solution 7: Use a Different Region’s Battle.net Store
Introduction
At times, you might find that certain Blizzard games aren’t available in your region due to various regional restrictions or release schedules. However, there’s a workaround for this – you can potentially access these games by changing the region of the Battle.net store within the app settings. This solution involves altering your store’s country selection to a region where the game is available. It’s important to note though, that switching regions just to access a game can sometimes go against the terms of service of the platform, so it’s essential to proceed with caution and at your own risk. Changing regions can open up an international library of Blizzard games but may also cause some issues or limitations, like dealing with currency exchange rates, payment methods, or future access to customer support.
Steps
Here are the detailed steps to change the region on the Battle.net store and download Blizzard games not available in your area:
- Install the Battle.net Desktop App
- If you haven’t already, download the Battle.net desktop app from Blizzard’s official website and install it on your computer.
- Log In to Your Battle.net Account
- Open the Battle.net app after installation and log in using your Blizzard account credentials.
- Open the Blizzard App Settings
- Click on the Blizzard logo often located at the top left corner of the app, then select ‘Settings’ from the dropdown menu.
- Change the Region
- Inside the ‘Settings’ menu, find the ‘Account’ or ‘Game Settings’ section. Look for an option labeled ‘Region’ or ‘Region Settings.’ Click on it to expand the dropdown menu and select a different region from the list available.
- Save Changes
- After selecting the desired region, make sure to save changes if necessary by clicking ‘Done’ or ‘Apply.’
- Browse the Store and Purchase the Game
- Go back to the main Battle.net interface and select the ‘Shop’ tab. You should now have access to the store of the region you have selected. Browse for the game you wish to download, complete the purchase process, and then proceed to download the game.
- Initiate the Download
- Once the purchase is confirmed, look for the game in your Battle.net library or in the ‘Games’ section. Click on the game icon and then select ‘Install’ to start the download process to your computer.
Summary
By using a different region’s Battle.net store, you can access and download Blizzard games that are not available in your own region. This method does allow for greater access to a global selection of content. However, the benefits come with potential downsides – customers may encounter issues with payment methods due to currency differences, increased game prices, language barriers, and possibly limited customer service support for regions outside your own. Additionally, changing your store’s region can sometimes conflict with the platform’s terms of service, potentially risking your account’s standing with Blizzard. Always consider the risks and proceed with caution when utilizing this method.
Introduction
In some situations, you may not be able to download Blizzard games on your personal computer due to various reasons such as hardware limitations, internet restrictions, or simply because you’re away from your own PC. Fortunately, Blizzard provides a solution for such scenarios through the Battle.net Desktop App, which you can use on public or shared computers. This method involves using the Battle.net app installed on a computer that is not your own and securely downloading your Blizzard games to play. Although this is a convenient alternative, it’s vital to maintain the security of your personal Blizzard account in the process. Let’s walk through the steps involved in utilizing public or shared networks to download Blizzard games.
Steps
- Ensure Personal Account Security: Before you proceed, it’s crucial to understand the risks associated with accessing your personal accounts on a public or shared computer. Always make sure the computer you are using has up-to-date antivirus software and that you’re mindful of your surroundings to keep your account credentials secure.
- Find a Suitable Computer: Locate a public computer where the Battle.net Desktop App is available, such as at a gaming café, library, or a shared computer at a friend’s house.
- Log Into Your Battle.net Account:
a. Open the Battle.net Desktop App on the public/shared computer.
b. If the app is logged into another account, log out from that account first.
c. Enter your Blizzard account details to log in. Double-check that the “Keep me logged in” checkbox is NOT selected to prevent saving your login information on the public/shared computer. - Set Up Secondary Authentication: For added security, it’s wise to set up two-factor authentication (2FA) with Blizzard’s SMS Protect or an authenticator app before logging in on a public network. This will provide an extra layer of security to your account when logging in from an unfamiliar location.
- Download Your Game:
a. Once logged in, navigate to the game library section within the Battle.net Desktop App.
b. Select the game you wish to download and click on the “Install” button.
c. Choose the preferred installation settings if prompted, such as installation folder and language.
d. The download will begin, and you can view the progress within the app. - Install and Launch the Game (Optional): Depending on the rules of the public space (some may not allow installations or play), you can proceed to install and even play the game after download is complete.
- Log Out and Clear Data:
a. Once your game download (and installation, if applicable) is completed, log out of your Blizzard account within the Battle.net app.
b. If possible, clear the browsing history, cache, and cookies if you used a web browser at any point during this process. - Safely Remove Any Personal Storage Devices: If you used a USB drive or any external device to store game files or personal data, safely eject it from the computer before leaving.
Summary
Using a public or shared computer to download Blizzard games is a convenient option for those who can’t do so on their personal PC. The major benefits include the ability to use high-speed internet available in some public places and the convenience of not having to install the Battle.net Desktop App on your own machine. However, this method comes with the potential downside of risking your account security if not done cautiously. Always be wary of your surroundings, use secure passwords, ensure you log out after use, and use secondary authentication methods to protect your account. It’s not the most recommended method due to these security concerns, but when conducted with caution, it can be a practical solution in certain circumstances.
Solution 9: Direct Download Link (If Provided)
Introduction
Blizzard Entertainment has a structured approach to downloading and installing games, mainly pivoting around their Battle.net desktop app. However, under specific circumstances—such as promotional campaigns, support provisions, or unique troubleshooting scenarios—Blizzard might distribute a direct download link to their users. This method bypasses the usual app-based installation process, providing a straightforward URL that users can navigate to in their web browser to download the game installer files directly. This is particularly useful when the Battle.net desktop app is not functioning correctly or is inaccessible for some reason.
Steps
Here’s a step-by-step guide on how to use a direct download link provided by Blizzard to download a game:
- Receive the Direct Download Link: Obtain the unique direct download link from Blizzard. This may come through an official support email, as part of a promotional offer, or in a response during a service ticket resolution.
- Ensure a Stable Internet Connection: Before you begin the download process, check that you have a reliable internet connection. A wired connection is often more stable than wireless, and make sure that no large files are being downloaded or uploaded simultaneously which could slow down your speeds.
- Use a Web Browser: Open your preferred web browser. This might be Google Chrome, Mozilla Firefox, Safari, or any other browser you’re comfortable using. Ensure that it is up to date to avoid any compatibility issues.
- Access the Link: Copy and paste the direct download link into the address bar of your web browser and press Enter. Ensure you do not alter the link in any way, as this will result in the download not working correctly.
- Download the Installer: Once the download page loads, you should see a prompt or a clickable button to start the download. Click the download button, and choose where you’d like to save the installer file on your computer if prompted.
- Run the Installer: After the download completes, navigate to the location where you saved the file, and double-click it to initiate the installation process. Some computers may ask for confirmation or an administrator password to proceed.
- Install Your Game: The installer will typically launch a setup wizard. Follow the on-screen instructions to install the game. This may include accepting terms and conditions, choosing an installation directory, and allowing the installation process to complete.
- Launch the Game: Once the installation is finished, you should be able to launch the game either from the final screen of the installation process or from a shortcut created on your desktop or within your Start menu.
- Blizzard Account Login: If the game requires it, log in using your Blizzard account credentials. If you don’t have an account, you’ll need to create one.
- Enjoy the Game: After logging in, you should be ready to play your game. Make sure to adjust any in-game settings such as graphics and controls to suit your preferences before you start.
Summary
Using a direct download link is an exceptional method for acquiring Blizzard games, primarily when the conventional routes through the Battle.net app are not a feasible option. It’s straightforward, quick, and doesn’t require additional software. However, remember that this option is not commonly available and is generally used in unique situations. Ensure the link is from an official Blizzard source to avoid potential security risks. The benefits include sidestepping technical issues with the Battle.net app and sometimes even faster download speeds since it’s a direct transfer. The potential downside is the rarity of this solution and the fact that it does not integrate with the Battle.net ecosystem, which could limit certain functionalities, such as easily accessible game updates or additional services provided by the app.
Solution 10: Using the Blizzard Mobile App for Remote Game Installation
Introduction
The Blizzard Mobile App is an application that allows users to stay connected with their Blizzard games on the go. It offers various features, including chatting with friends, browsing the shop, managing your account, and, at times, the ability to remotely initiate downloads of Blizzard games to your PC. This method is particularly useful when you are away from your computer but want to have a game ready to play by the time you return. Although not as direct as downloading through the Battle.net desktop app, it’s an added convenience for gamers.
Steps
To use the Blizzard Mobile App for remote game installation, follow these straightforward steps:
- Download the Blizzard Mobile App:
- Navigate to the App Store (for Apple devices) or Google Play Store (for Android devices).
- Search for the ‘Blizzard Mobile App’.
- Download and install the app onto your mobile device.
- Log In to Your Blizzard Account:
- Open the Blizzard Mobile App.
- Tap ‘Login’ and enter your Blizzard account credentials.
- If you have Blizzard’s two-factor authentication enabled, you’ll need to provide the additional code sent to your email or authenticator app.
- Navigate to the Shop:
- Once logged in, you will find the different menu options within the app.
- Tap on the ‘Shop’ icon generally located at the bottom or through the app’s main menu.
- Browse and Select Your Game:
- In the shop section, browse through the available games.
- Select the game you wish to download by tapping on it.
- Initiate Remote Game Installation:
- After selecting your game, you might find an option for ‘Remote Install’ if available and your PC is eligible for it.
- Tap on ‘Remote Install.’ This will send a signal to the Battle.net app on your PC to begin downloading the game.
- Please note that for this feature to work, your PC must be turned on, connected to the internet, and the Battle.net desktop app must be running.
- Check Download Progress:
- You can verify that the download has started by checking the Battle.net app on your PC.
- If you’re not at your PC, you can check later when you have access to it to ensure the download has commenced or completed.
Summary
Benefits of using the Blizzard Mobile App for remote game installation include the convenience of setting up downloads from anywhere, ensuring that your games are ready to play as soon as you get back to your PC. This saves time and provides immediate access to your games upon arrival.
However, there are potential downsides such as the requirement that your PC must be online and have the Battle.net desktop app running. Without this setup, remote installation won’t work. Also, the ‘Remote Install’ feature may not always be available for all games or at all times. It is also important to be aware of the security risks associated with logging into your account on mobile devices and the importance of logging out after you’ve finished using the app, especially on shared or public devices. Always protect your account with a strong password and consider enabling two-factor authentication for added security.
Conclusion:
Downloading Blizzard games is a user-friendly process, thanks to the Blizzard Battle.net desktop app. This guide has walked you through the steps of setting up your account, navigating the app, selecting your game, and managing the download process. With these straightforward directions, you’re now ready to delve into the epic worlds and adventures that Blizzard games offer. Enjoy your gaming journey!
FAQs:
- Do I need an Internet connection to play Blizzard games after I download them?
Some Blizzard games require a persistent internet connection for online play and to access the latest content and features, while others can be played offline. - Can I download games on a mobile device through Blizzard?
Blizzard games are primarily designed for PC or console play and are downloadable through the Blizzard Battle.net desktop app. However, mobile-specific titles may be available through respective app stores. - What should I do if my download is stuck or very slow?
Check your internet connection, pause and resume the download, ensure enough storage space on your device, or try restarting the Blizzard Battle.net desktop app. If issues persist, Blizzard’s customer support can provide further assistance.