Picture this: Your audience, hanging on every word, captivated by your gaming prowess or your engaging storytelling. But instead of a clear, rich voice, they’re met with muffled sounds, echoes, or unwanted background noise. It’s like serving a gourmet meal on a paper plate.
Fear not! In this comprehensive guide, we will take you on a journey through the labyrinth of OBS microphone settings, transforming your audio from cacophonous chaos to a symphony of sound. Whether you’re a beginner or a tech-savvy guru, get ready to discover the secrets of impeccable audio that will elevate your streams, recordings, and broadcasts to new heights.
The Crucial Need for Optimal Microphone Settings in OBS
Why do you need to dive deep into those intricate OBS microphone settings? Here’s the deal: your microphone is your voice, your charisma, and your storytelling prowess all rolled into one. It’s the conduit through which you connect with your audience, building a loyal following or sending them fleeing.
Consider that you’re in the middle of an intense gaming session or a riveting storytelling moment, and your audience is hanging onto every word. Your voice should be the clarion call, the anchor that keeps them engaged. However, without the right microphone settings, it could turn into a distracting, noisy mess.
Here’s why getting your OBS microphone settings just right is absolutely crucial:
- Audio Clarity: Muddled, unclear audio is the quickest way to lose your audience. Crystal-clear sound ensures your message comes across loud and clear.
- Professionalism: Whether you’re aiming for a professional streaming career or just want to look the part, high-quality audio is non-negotiable. Viewers equate clear sound with professionalism.
- Viewer Retention: Great audio quality keeps viewers glued to your content. Poor quality sends them scrolling past.
- Engagement: A good microphone setup enhances engagement. Your audience is more likely to comment, share, and subscribe when they can hear you clearly.
- Personal Branding: Your voice is an integral part of your personal brand. It’s what sets you apart from the rest.
- Content Versatility: Optimal microphone settings open up opportunities for diverse content creation, from gaming commentary to podcasting.
In essence, OBS microphone settings are your secret sauce for captivating and retaining your audience. They elevate your content from amateur to professional and help you stand out in the crowded digital landscape.
Best Mic Settings for OBS
Microphone settings in OBS can make or break your streaming and content creation experience. These settings, often referred to as mic filters, are your secret weapons for enhancing audio quality. Let’s dive into the essentials:
Utilizing OBS Mic Filters
We’ll guide you completely about OBS mic filters and their utilization in the professional setup. You need to understand and carry out the following processes:
Understanding Mic Filters
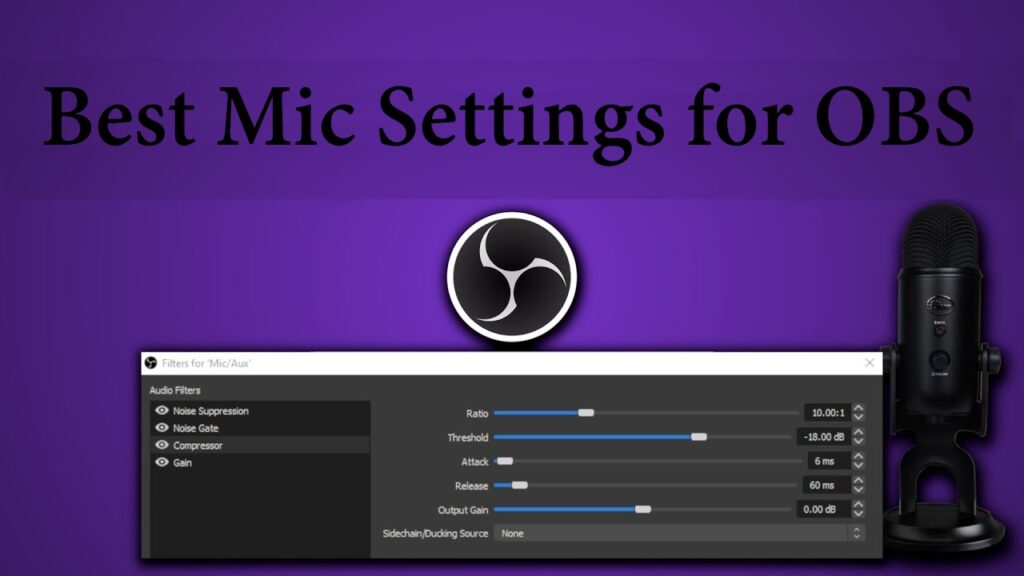
Mic filters are a set of tools within OBS designed to improve microphone sound quality. Here are some common OBS mic filters:
- Compressor: Balances audio levels, making your voice consistent.
- Noise Suppression: Reduces or eliminates background noise.
- Noise Gate: Blocks unwanted background noise when you’re not speaking.
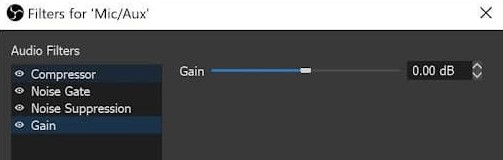
- Gain: Boosts microphone volume when needed.
Adding Mic Filters
To add mic filters to OBS, follow these simple steps:
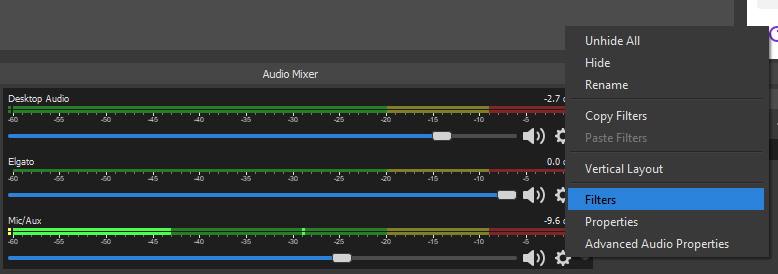
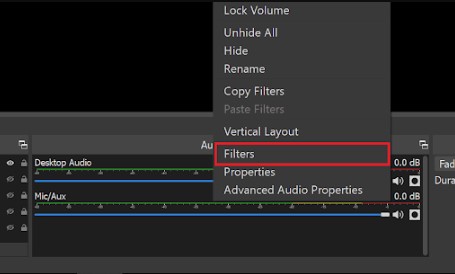
- Step 1: Right-click on “Mic/Aux” in OBS and select “Filters” from the menu.
- Step 2: Click the “+” icon to view available OBS filters, including plugins.
- Step 3: Choose filters that suit your needs and configure them.
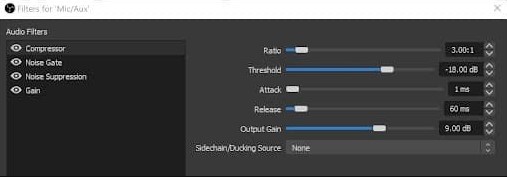
Configuring Compressor
The compressor smoothens audio by making loud sounds quieter and improving consistency. Experiment with these settings:
- Compressor Ratio: Adjust compression level.
- Threshold: Set the activation point.
- Attack: Define how quickly it activates.
- Release: Determine how quickly it deactivates.
- Output Gain: Boost the output.
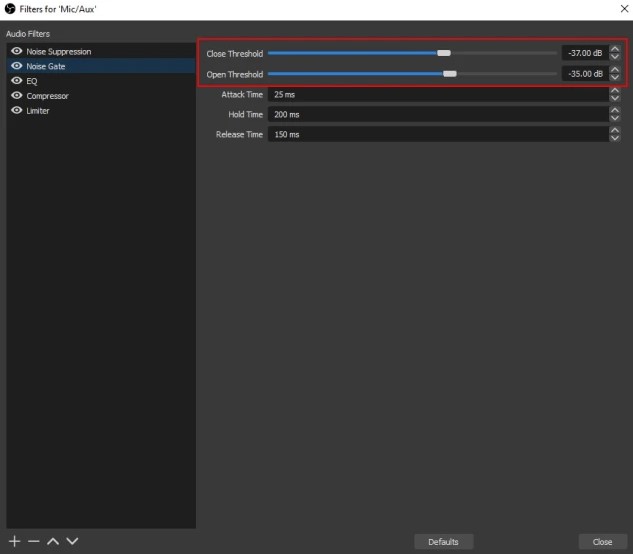
Tuning Noise Gate
The Noise Gate eliminates unwanted background noise. Ensure no sound is detected by the Mic/Aux indicator when you’re silent. Adjust settings:
- Close Threshold: Mute sounds below this level.
- Open Threshold: Allow sounds above this level.
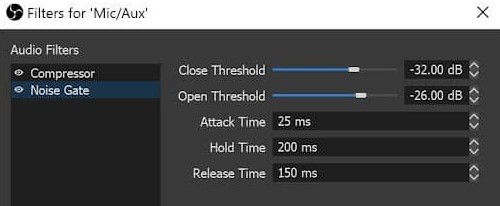
Tip: Keep the “Close Threshold” slightly higher than the “Open Threshold” for clear voice isolation.
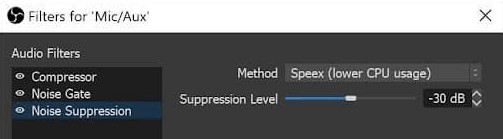
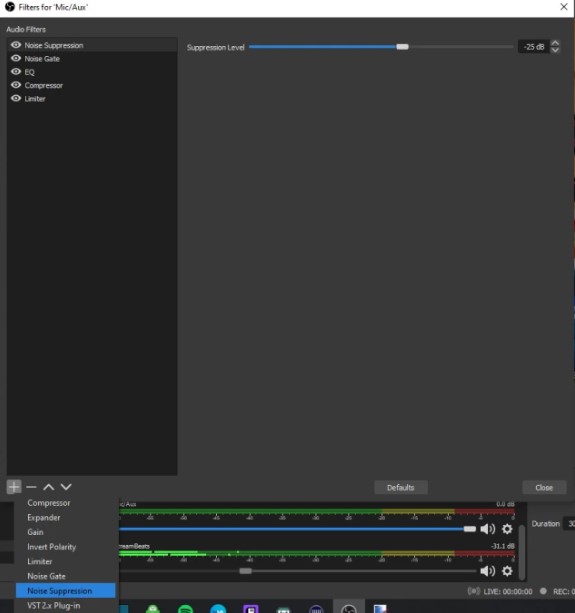
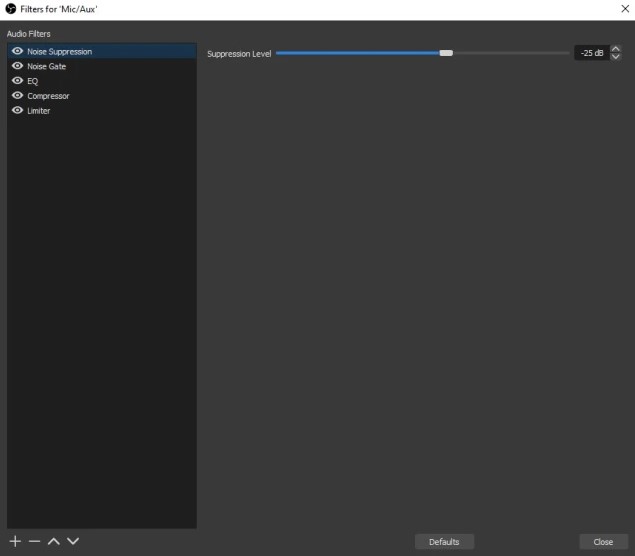
Mastering Noise Suppression
Noise Suppression targets smaller background noises like equipment sounds. OBS offers options like “Speex” and “RNNoise.” Test to find the best fit and set suppression to -30dB for most devices.
Adjusting Gain
Use Gain to increase or decrease volume as needed. Default settings usually suffice, but you can fine-tune them. Remember, gradual adjustments prevent audio distortion and maintain quality.
Using a Combination of System Settings and OBS Settings
Sadly, most of us don’t have the luxury of professional studios for streaming. Without adjustments, your voice might distort when it’s loud, be drowned out by gameplay when you speak softly, and capture unwanted background noises.
It’s vital to tackle these issues because your microphone is your primary tool for communicating and creating content. Fortunately, you can address these problems in OBS, Streamlabs OBS, or any mixer you prefer. Follow the below steps, and your microphone audio will improve significantly!
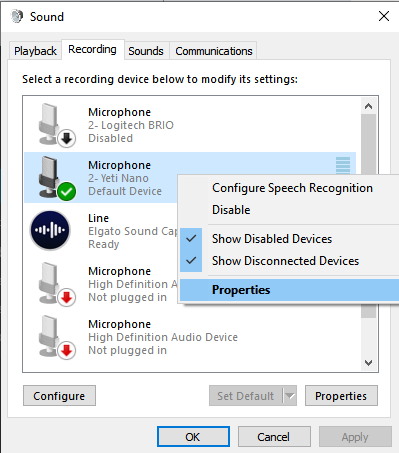
- In Windows, go to the Sound menu. Find your microphone under “Recording,” right-click it, and choose “Properties.”
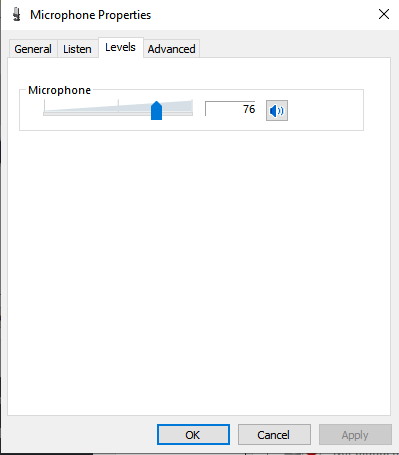
- Inside the “Microphone Properties” menu, navigate to the “Levels” tab and confirm your mic is set to around 70-80%.
- Download and install the free VST package called ReaPlugs.
- In OBS, head to your audio mixer, click the gear icon, and choose “Filters.”

- In the Mic menu, click the “+” icon and include Noise Suppression from the list.
- Adjust the Noise Suppression level to eliminate background noises like fans, furnaces, or passing cars. Begin at -10 dB, and decrease it until your microphone no longer captures room noise. Once you reach this point, you’re good to go.
- Return to the “+” symbol and add a Noise Gate to eliminate subtle noises like alarm clocks and breathing. Concentrate on the Close Threshold and Open Threshold settings. Talk at the lowest volume you’d use during a stream, adjust the Close Threshold, and raise it until your voice starts to cut out. Then increase the dB slightly and set the Open Threshold slightly higher than the Close Threshold.
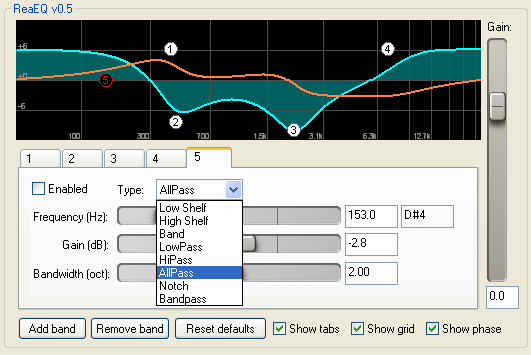
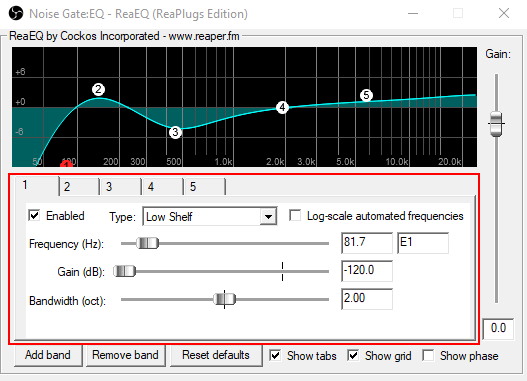
- Return to the “+” symbol and add a “VST 2.x Plug-in.” Choose “reaeq-standalone” from the list and click “Open Plug-in Interface.”
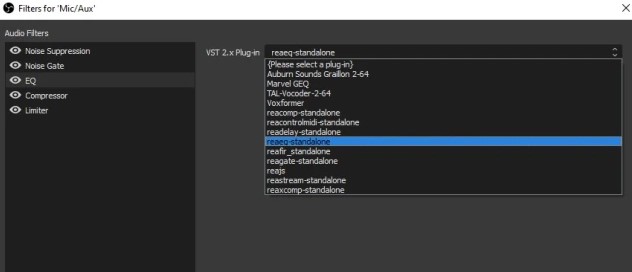
- Note that this step can be a bit complex. You’re entering the world of the unlimited-band equalizer, where you can adjust your voice’s volume across various frequencies. Equalizing your voice can be challenging, as each voice and microphone is unique. Online guides offer various approaches to this process.
- Add a Compressor by revisiting the “+” symbol. This filter is crucial as it evens out volume variations, ensuring a consistent microphone output that doesn’t distort and blends well with other audio sources. While you can follow the settings above, remember that ideal configurations depend on your voice, microphone, and environment. Follow these steps for fine-tuning:
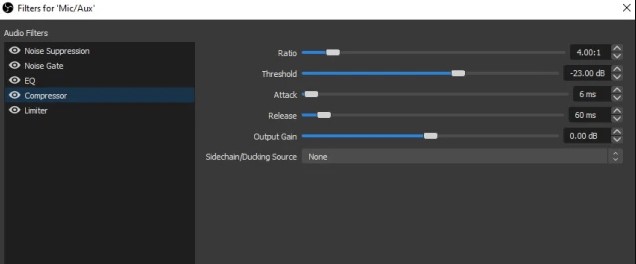
- Set the Ratio to 4:1, an industry standard for compression.
- Begin with Threshold at zero and speak into the microphone at your loudest realistic level.
- Gradually lower the Threshold until your voice starts to quiet down, using either headphones or monitoring the mixer’s color bars.
- Once it starts dropping, reduce the Threshold by 10 dB.
- Adjust Output Gain to raise the volume while speaking at the loudest level until it touches the red zone.
- Slightly lower the gain to ensure your voice remains close to the red without crossing the line. This helps prevent distortion during moments like laughter, coughs, or harsh syllables.
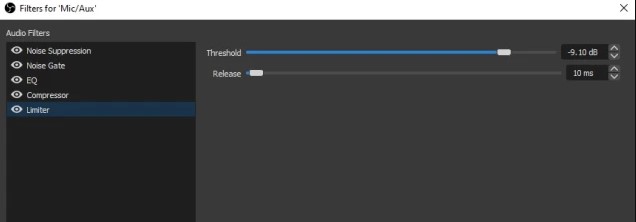
- Finally, click the “+” and introduce a limiter. Think of it as a robust compressor that swiftly stops any sound exceeding a defined range. Place this at the end of your audio chain to capture occasional loud moments in your voice. Be cautious not to overuse it, as an overly aggressive limiter can distort your voice, making it sound unnatural.
Audio Filters Settings Recommendation in OBS
To include Filters, navigate to the Audio Mixer, click the ‘cog icon,’ and select ‘Filters.’ Click the ‘+’ button to add a new filter.
- Noise Suppression
Begin at -10dB and reduce further if noise persists. - Noise Gate
- Close Threshold at -32dB.
- Open Threshold at -26dB; adjust if necessary.
- Compressor
- Set Ratio to 4:1.
- Start with a Threshold of 0 and fine-tune.
- Lower Output Gain until it stays out of the red zone.
- Limiter
- Keep Release Time under 100ms.
- Start with a Threshold of 0 and make adjustments as needed.
OBS Audio Filters Comparison
| OBS Filter | Purpose | OBS Settings | Time to Configure |
| Compressor | Consistent levels. Makes loud sounds quieter. | Ratio 3:1Threshold – 18dBAttack – 1msRelease – 60msOutput Gain – 9dB | 10-15 Minutes |
| Noise Gate | Helps capture only your intended sounds | Close Threshold – 32dBOpen Threshold – 26dBAttack Time – 25msHold Time – 200msRelease Time – 150ms | 10-15 Minutes |
| Noise Suppression | Helps eliminate background noise | Suppression – -30dB (Speex / RNNoise) | 2 Minutes |
| Gain | Helps boost your microphone’s volume | Default 0 -Adjust as appropriate | 2 Minutes |
Conclusion
In this comprehensive guide, we’ve explored the best microphone settings for OBS, a crucial aspect of enhancing your streaming and content creation experience. These OBS mic filters—Compressor, Noise Gate, Noise Suppression, and Gain—offer the power to transform your audio quality from ordinary to exceptional. By adjusting these settings thoughtfully, you can eliminate background noise, maintain consistent audio levels, and ensure your voice takes center stage, even in the midst of intense gameplay or storytelling.
While our guide provides a solid foundation, remember that the ideal microphone settings may vary depending on your unique voice, microphone, and recording environment. Don’t hesitate to experiment and fine-tune these settings to achieve audio perfection.
We’d love to hear from you! Have you found this guide helpful in optimizing your OBS microphone settings? Please take a moment to share your thoughts, suggestions, or any tips you’d like to add. Your feedback is essential in shaping our future content and assisting fellow content creators. Thank you for being a part of our community!
Frequently Asked Questions
What should the mic limiter be set at?
Set the limiter’s threshold just under the audio signal’s peaks until you get around -2 to -3 dB of gain reduction. Using more than that can introduce noise and unwanted artifacts.
What is the best mic audio setting for OBS?
Here are recommended OBS mic settings:
- Ratio: 3:1
- Threshold: -18dB
- Attack: 1ms
- Release: 60ms
- Output Gain: 9dB
What is the best setting for a microphone?
Avoid setting your microphone’s input to the maximum level. Instead, lower it to around ¾ of the original level, or aim for an input level of -12 dB.
What do OBS audio filters do?
OBS filters, like Compressor, Noise Gate, and Noise Suppression, improve audio quality. Compressor evens out audio levels, Noise Gate captures intended sounds, and Noise Suppression eliminates background noise.
What is the best audio level in OBS?
For OBS recording, set the audio rate to 320 in track one. Adjust other settings to best match your computer’s capabilities.
What is a good audio bitrate in OBS?
You can use as low as 64 kbps for audio-only streaming, but for better quality, consider 192-320 kbps.
What is a good microphone sensitivity?
Most microphones have sensitivity between -46 dBV and -35 dBV, offering a good balance between noise and maximum input.
Why is my mic on OBS so bad?
Mic issues in OBS may result from outdated audio drivers. Update your drivers for potential fixes.
How do I reduce background noise in OBS?
Use OBS’s Noise Suppression filter to reduce background noise, starting with the default setting of -30dB.
Is OBS good for voice recording?
OBS is primarily designed for screen recording with audio but can be used for voice recording when configured appropriately.
What if gain is too low?
Insufficient gain results in a low signal-to-noise ratio (SNR) and noisy audio. Ensure your system has adequate voltage for high-fidelity digital conversion.
What dB should OBS be?
Aim for -3 dB (3 lines to the left of 0, in the red) on the microphone input and output in OBS for optimal audio levels.
What is the ideal audio level?
Critical listening is best done at 80-85 dB SPL for balanced frequencies and low hearing damage risk.
What mic cancels background noise?
Dynamic microphones are less sensitive and better at blocking background noise compared to condenser mics.
How do I reduce mic latency in OBS?
Reduce mic latency by adding a negative offset (e.g., -500ms) to your audio source in OBS’s Advanced Audio Properties.
What is the best noise suppression for OBS?
OBS offers two default noise suppression options, Speex (low CPU usage, low quality) and RNNoise (good quality, more CPU usage). You can also add an Audio Gate to mute the microphone when not speaking automatically.