Typing on a keyboard may seem like a straightforward task, but it often involves more than just pressing keys. When it comes to special characters like the letter ‘n’ with accents—such as , which is commonly used in Spanish and other languages—the process can be slightly more complex. Whether you’re composing an email, writing a document, or chatting online, knowing how to type these characters is essential for effective communication. This guide will provide you with simple, step-by-step instructions on how to type the letter ‘n’ in various forms on your keyboard, ensuring you can convey your message accurately, no matter the language.
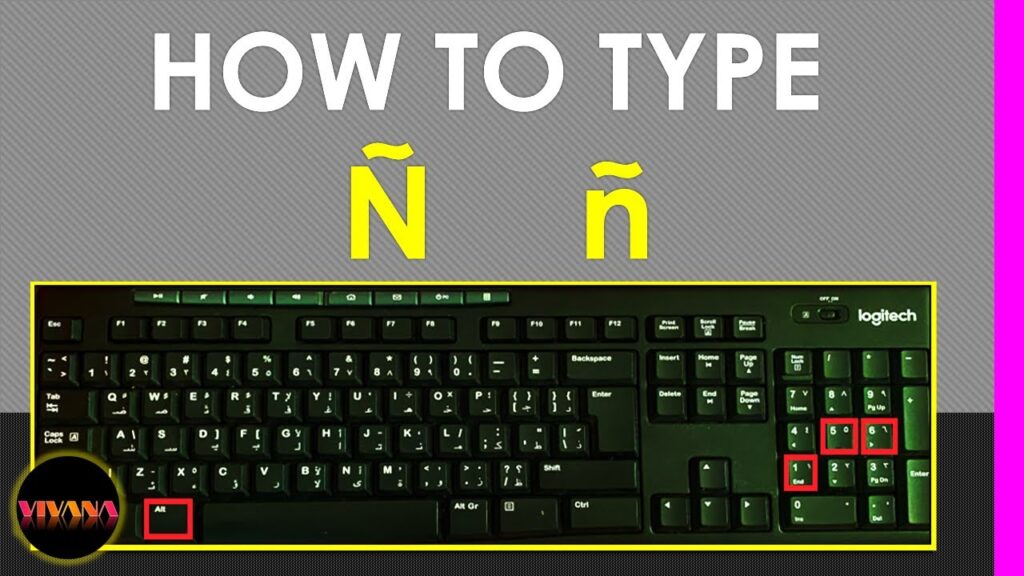
Solution 1: Using the Alt Code
Introduction
The Alt Code method is a simple and effective technique for typing special characters that are not readily available on a standard keyboard layout. This method leverages a built-in feature of Windows operating systems that allows users to insert a variety of characters, including the special “ñ” (enye), by pressing the ‘Alt’ key in combination with a specific numeric code on the numeric keypad. This is particularly useful if you need to type names, words, or phrases in languages that use this character and your keyboard does not support it by default. The numeric code for each character is part of the ASCII (American Standard Code for Information Interchange) or Unicode standard, making this method reliable and consistent across different Windows-based systems.
Steps
- Ensure that Num Lock is enabled on your keyboard. If it’s not, you can usually turn it on by pressing the ‘Num Lock’ key. When Num Lock is activated, you can use the numeric keypad to the right of your keyboard.
- Hold down the ‘Alt’ key on your keyboard. It’s important to keep this key pressed the entire time while entering the numeric code.
- While holding down the ‘Alt’ key, use the numeric keypad to type in ‘164’ for lowercase ‘ñ’ or ‘165’ for uppercase ‘Ñ’. Please make sure you’re using the numeric keypad and not the row of numbers at the top of the keyboard.
- Release the ‘Alt’ key. Once you release it, the “ñ” or “Ñ” character should appear in the text field or document where your cursor is placed.
To summarize, the steps would look like this for lowercase ‘ñ’:
- Turn on Num Lock.
- Hold down Alt key.
- Type ‘164’ on the numeric keypad.
- Release Alt key.
And for uppercase ‘Ñ’:
- Turn on Num Lock.
- Hold down Alt key.
- Type ‘165’ on the numeric keypad.
- Release Alt key.
Summary
Using the Alt Code to type “ñ” is a quick and straightforward solution for Windows users. Its benefits include not needing to change any settings or install additional software. Moreover, it works across many different applications, making it versatile. However, there are a few potential drawbacks. For one, it requires a numeric keypad, so it’s not suitable for laptops or keyboards without one (unless they have a function (Fn) key that enables a numeric keypad overlay on the main keys). Additionally, it can be cumbersome to remember the specific numeric codes for characters that are not used frequently, and it may not be the fastest method for typing characters repeatedly in a text. Despite these potential downsides, the Alt Code remains a reliable and essential technique for anyone needing to type special characters on a Windows PC.
Solution 2: Character Map Application
Introduction:
The Character Map application is a utility available in Microsoft Windows operating systems that helps users find and use various characters that are not directly available on the keyboard. This tool displays a wide array of symbols, from different language alphabets to mathematical operators and special punctuation marks. It’s a perfect solution for users who need to type an ‘ñ’ (enye) character but don’t have it on their physical keyboard. The Character Map is user-friendly, doesn’t require any technical expertise to use, and doesn’t involve memorizing any codes or shortcuts.
Steps:
- First, locate the Character Map on your computer. You can do this by clicking on the Start menu and typing “Character Map” into the search bar. Then, click on the Character Map application from the list of search results.
- Once the Character Map application is open, you’ll see a grid of characters that are available in the selected font. You can change the font in the drop-down menu at the top if you’re looking for a specific style for the ‘ñ’ character.
- Scroll through the grid or use the scrollbar to find the ‘ñ’ character. Depending on the font, the placement of the ‘ñ’ character may vary, so take your time to look through the grid.
- Click on the ‘ñ’ character to select it. You’ll notice that it becomes highlighted in the grid.
- After selecting the ‘ñ’ character, look towards the bottom of the Character Map window. You will see a section that says “Characters to copy.” Your selected ‘ñ’ will appear in that text box.
- With the ‘ñ’ character in the text box, click the “Copy” button located next to that box. This will copy the ‘ñ’ character to your clipboard.
- Now, go to the document or text field where you want to insert the ‘ñ’ character.
- Right-click the spot where you want the character to appear, and select “Paste” from the context menu. Alternatively, you can use the keyboard shortcut Ctrl+V to paste the ‘ñ’ character.
Summary:
Using the Character Map application in Windows to type the ‘ñ’ character offers several benefits. It’s convenient for users who do not type special characters frequently and therefore might not benefit from learning keyboard shortcuts or altering their keyboard layout. Additionally, this method provides a visual reference, reducing the likelihood of errors.
The downside, however, is the process can be time-consuming if you need to type special characters regularly, as it involves several steps. For occasional use, though, the Character Map is a perfect balance between accessibility and functionality, allowing even users with minimal technical knowledge to type the ‘ñ’ and other special characters with ease.
Solution 3: Keyboard Shortcuts
Introduction:
In the digital era, efficiency is key, and one of the fundamental ways to achieve this is through the use of keyboard shortcuts. Keyboard shortcuts are combinations of keys that provide a quick way to perform certain tasks or actions on a computer without the need for mouse clicks or navigating through menus. They can greatly speed up your workflow and reduce the strain of repetitive tasks. For our purposes, we are interested in keyboard shortcuts that allow us to type a special character like ”. This character is used in Spanish and some other languages and has a distinctive tilde (~) above the letter ‘n’. While not native to standard English keyboards, there are shortcuts built into various operating systems that make typing ” quick and easy once you know the right keys to press.
Steps:
- For Windows Operating Systems: a. Ensure that your Num Lock is on. This is usually indicated by a light on the keyboard. b. Hold down the ‘Alt’ key on your keyboard. c. While holding the ‘Alt’ key, type the number code for ” on your numeric keypad, which is ‘0241’ for lowercase or ‘0209’ for uppercase ”. d. Release the ‘Alt’ key, and the ” or ” character should appear in your text field.
- For macOS: a. Press and hold the ‘Option’ or ‘Alt’ key on your keyboard. b. While holding the ‘Option’ key, press the ‘n’ key once to create the tilde accent. c. Release both keys and then quickly press the ‘n’ key again to create a lowercase ”, or ‘N’ key for an uppercase ”.
- For Linux Distributions: a. Like with macOS, press and hold the ‘Alt’ key or ‘Alt Gr’ key which is often located to the right of the space bar. b. While holding, press the ‘n’ key once to yield the tilde symbol. c. Release the keys and press the ‘n’ again for ” or ‘N’ for ”.
Summary:
Learning and using keyboard shortcuts to type ” can greatly expedite the process of writing in a language that uses this special character. Not only does this method save time, but it also keeps you from having to search through the character map or alter your keyboard settings continually. The potential downside is the need for memorization and the fact that the key combinations vary between different operating systems. Nevertheless, once committed to muscle memory, these shortcuts provide a seamless typing experience and ensure that your focus remains on your writing, not on the mechanics of character input.
Solution 4: International Keyboard Layout
Introduction
The challenge some users face is typing special characters, such as the letter “” (commonly used in Spanish and other languages), which is not present on standard English keyboard layouts. For users who frequently need to type such characters, one of the most efficient solutions is switching to an International Keyboard Layout. This layout is specially designed to accommodate additional characters used in various languages. Unlike relying on character-specific codes or navigating through maps of symbols, the International Keyboard Layout seamlessly integrates special characters into your typing flow through the use of simple key combinations.
Steps
- Access Keyboard Settings:
- For Windows, open the Start menu and go to Settings > Time & Language > Language.
- On macOS, open System Preferences and click on Keyboard, then select Input Sources.
- Add an International Keyboard:
- In Windows, under the “Preferred languages” section, click on the language for which you want to add the keyboard layout, then click on “Options” and “Add a keyboard.” Select the International keyboard from the list.
- On macOS, click the + button to add a new input source. Choose the language that corresponds with the International Keyboard from the list and select the International layout.
- Switch to the International Keyboard Layout:
- For Windows, you can switch between keyboards by clicking on the language icon in the taskbar and selecting the International Keyboard.
- On macOS, you can switch by clicking on the Input menu in the menu bar or by using a keyboard shortcut (typically Control + Space).
- Typing the “” Character:
- With the International Keyboard active, to type the “” character, first press the key that corresponds to the tilde symbol (
~) – usually located to the left of the number 1 on the keyboard. Release this key, then press the “n” key. The “” character should now appear in your text.
- Tips for Effective Typing:
- Get familiar with other special characters and accents available through the International Keyboard Layout.
- You can always switch back to your default keyboard layout when not typing special characters to maintain your usual typing habits.
- Practice using the International Layout to improve your speed and accuracy when typing special characters.
Summary
Switching to an International Keyboard Layout can greatly simplify the process of typing “” and other special characters. This solution requires initial setup, but once implemented, it becomes a natural part of your typing experience, requiring minimal extra steps. However, it might take some time to get accustomed to new key combinations, and users might accidentally type special characters when they’re not intended. Despite this slight learning curve, the benefits of having a diverse range of characters readily available at your fingertips can be particularly useful for bilingual typists, students of foreign languages, or professionals working with international texts.
Solution 5: On-Screen Keyboard
Introduction
Using an on-screen keyboard is a convenient workaround for typing special characters when they are not readily accessible on a physical keyboard. This is especially useful for individuals who may face challenges using traditional key combinations or do not have a keyboard with a numeric keypad. The on-screen keyboard displays a virtual keyboard on your screen, allowing you to input characters by simply clicking on them with your mouse or, if you have a touchscreen device, by tapping them with your finger. This approach negates the need to remember key codes or shortcuts and can be particularly beneficial for those with mobility or cognitive impairments, as it offers a clear and direct method of selecting characters.
Steps
- Access the On-Screen Keyboard:
- On Windows, you can open the on-screen keyboard by going to the ‘Start’ menu, typing “on-screen keyboard” in the search box, and selecting the ‘On-Screen Keyboard’ app. Alternatively, you can access it through the ‘Ease of Access’ settings.
- On macOS, open ‘System Preferences’, then select ‘Keyboard’. Check the option ‘Show Keyboard, Emoji & Symbol Viewers in menu bar’. Click the new menu bar item and choose ‘Show Keyboard Viewer’.
- Locate the Special Character (”):
Once the on-screen keyboard is open, you must find the ” character. If your keyboard layout does not show the ”:
- For Windows:
Change the keyboard layout by clicking on the language icon in the taskbar (which might be labeled ‘ENG’ for English) and select the Spanish layout (‘ESP’), which includes the ” key. - For macOS:
With the ‘Keyboard Viewer’ open, hold down the ‘Option’ key to see alternate characters. You should see the ” appear on one of the keys. Alternatively, switch the active keyboard layout to Spanish to access the ” directly.
- Type the ” Character:
- Click on the ” key on the on-screen keyboard using your mouse, or, if using a touchscreen, tap the character with your finger or stylus.
- The ” character will appear in the text field where your cursor is located in the application you are using.
- Alternative Method Using Key Combinations:
- If you prefer, while using the on-screen keyboard, you can click on the ‘Shift’ or ‘Alt’ keys to access different character sets or input accented characters as necessary.
- Closing the On-Screen Keyboard:
- Once you have typed the necessary characters, you can close the on-screen keyboard by clicking the ‘X’ in the top-right corner of the keyboard window or by minimizing it for later use.
Summary
The On-Screen Keyboard solution brings the benefit of visual assistance for entering special characters and is highly useful for users who may not be familiar with keyboard shortcuts or Alt codes. It makes the typing process straightforward, accessible, and less intimidating. Moreover, for users with accessibility needs, it’s an excellent built-in feature that accommodates a diverse range of abilities.
However, typing with an on-screen keyboard can be slower than using a physical keyboard and may disrupt the user’s workflow, especially if they are proficient typists. Additionally, relying on the on-screen keyboard can take up screen real estate, which might be an inconvenience for those working with limited screen size. Despite these potential drawbacks, the on-screen keyboard remains a valuable tool for anyone needing a simple and direct method to type special characters like ”.
Solution 6: Input Method Editors (IMEs)
Introduction
In today’s digital age, typing in various languages and including special characters like ” (n with a tilde) is vital for proper communication and documentation. To address this need, Input Method Editors (IMEs) have been developed. IMEs are software applications that allow users to enter characters and symbols not found on their standard keyboard. This is incredibly beneficial for languages that have a larger set of characters, such as Chinese, Japanese, and Korean. However, IMEs also cater to accentuated characters used in Western languages, like Spanish, which uses the ” character frequently.
Installing an IME typically involves a software that runs alongside your operating system. It interprets key combinations and sequences that you type on your regular keyboard and converts them into special characters. For example, while using a Spanish IME, typing ‘n’ followed by a tilde symbol or a specific key combination might result in an ”.
Steps
- Determine the Required IME: First, identify the language or the particular character you need to type regularly and find the appropriate IME. For ”, you would typically look for a Spanish IME.
- Find and Install an IME: Depending on your operating system, locate the IME in your settings or download it from a reliable source. For Windows users, you could go to ‘Settings’ > ‘Time & Language’ > ‘Language’. Click on the language you want to add an IME for, and see the options available under ‘Keyboard’.
- Activate the IME: Once installed, activate the IME through your system settings. This may require you to restart your computer or log out and back in.
- Access IME Instructions: After installation and activation, familiarize yourself with the key combinations by accessing the IME instructions. These could be found within the IME settings or help documentation.
- Practice Typing: Use the IME to practice typing ”. Each IME may have a different method, but often you’ll either press a specific key after typing ‘n’ or type a combination of keys to produce the character directly.
- Switching Between IMEs: If you switch between languages or need to type without special characters, learn how to quickly toggle between your regular keyboard layout and your IME, which is often done through a keyboard shortcut or taskbar icon.
Summary
Using an Input Method Editor (IME) is an elegant solution to type the ” character seamlessly and is particularly useful if you often type in Spanish or other languages requiring special characters. IMEs offer a high degree of flexibility and are customizable to fit the user’s typing habits.
However, there could be potential downsides, such as a slight learning curve in getting familiar with the IME or issues with software compatibility. Additionally, IMEs may consume a small amount of system resources and could initially slow down your typing speed until you are accustomed to the key combinations. Overall, IMEs are a powerful tool for anyone looking to expand their typing capabilities beyond the limitations of their physical keyboard.
Solution 7: Copy from the Web or Document
Introduction
Sometimes, you may need to use a special character that’s not readily available on your keyboard, such as the letter “” (an ‘n’ with a tilde on top). If you find yourself in a situation where you need to type this character but don’t know the specific keyboard shortcuts or don’t have them enabled, a simple and straightforward solution is to copy the character from another source, such as a web page or document where it already exists, and paste it into your work. This method is particularly user-friendly because it does not require memorizing codes or configuring your keyboard settings. In this section, we will examine how to locate the “” character online or in a document, copy it, and then paste it to the desired location in your own document or input field.
Steps
- Locate the Character:
- Open your web browser and go to a search engine such as Google.
- In the search bar, type “letter ” or a word that contains the character (like “nio”) and perform the search.
- Alternatively, if you have a document that already contains the “” character, open that document.
- Copy the Character:
- Once you’ve found the character in the search results or your document, use your mouse or trackpad to highlight the “” character.
- Right-click on the highlighted character and select “Copy” from the context menu. On a touchscreen device, you might press and hold the selection, then choose “Copy.”
- If you prefer using keyboard shortcuts, you can often press
Ctrl + Con Windows orCommand + Con Mac once the character is highlighted to copy it.
- Paste the Character:
- Navigate to the document or field where you need to type the “” character.
- Click on the spot where you want the “” to appear so that your cursor is in the correct position.
- Right-click and choose “Paste” from the context menu to insert the character. On a touchscreen device, press and hold the spot and then select “Paste.”
- If keyboard shortcuts are your preference, you can usually press
Ctrl + Von Windows orCommand + Von Mac to paste the character.
Summary
Using the “Copy from the Web or Document” method to input the “” character is beneficial for its simplicity and accessibility. It is a great solution for those who may not be technically savvy or for one-time uses where configuring settings is not worthwhile. You do not need to memorize any shortcuts or alt codes, and it works across nearly all applications and operating systems.
However, this method can be inefficient if you need to type the “” character frequently, as it requires several steps each time. It also relies on having access to the internet if you are searching for the character online or to a document that already contains it. Despite these potential downsides, for many users, the simplicity and universality of the “Copy from the Web or Document” solution outweigh any inconveniences, making it a valuable tool to know when typing special characters.
Solution 8: Using a Shortcut in Word Processors
Introduction
When working with word processing software, like Microsoft Word, inserting special characters such as “” can often be a cumbersome task for those not familiar with various character-insertion methods. Fortunately, word processors offer built-in shortcuts that make this process much easier, as well as the option for users to create their custom shortcuts for characters they frequently use. This can greatly improve writing efficiency, ensuring that the flow of thought is not interrupted by the mechanics of character insertion. Here we will focus on how you can leverage these shortcuts to type the “” character effortlessly.
Steps
- Open your word processor (for this example, we’ll assume you’re using Microsoft Word).
- If your document requires frequent use of the “” character, it would be beneficial to use a built-in shortcut if available or create one.
- To use a built-in shortcut, usually you would press the “Ctrl” key combined with a tilde key (` or ~), immediately followed by the “n” key. This results in an “” appearing in your document. The exact combination can sometimes vary depending on the version of Word or the keyboard layout you are using.
- To create a custom shortcut, follow these steps: a. Go to the ‘Insert’ tab at the top of the Word document. b. In the ‘Symbols’ group, click on ‘Symbol’ and then choose ‘More Symbols…’. c. In the Symbol window, make sure you are on the ‘Symbols’ tab and select the font you are using from the dropdown menu. d. Scroll through the list of symbols or characters until you find the “”. Click on it to select. e. Once the “” is selected, click on the ‘Shortcut Key…’ button to create a custom shortcut. f. In the ‘Customize Keyboard’ dialog, place your cursor in the ‘Press new shortcut key’ input field. g. Press the combination of keys you want to assign as your shortcut for the “” character (for example, you could use “Ctrl + Shift + N”). h. Before you assign the command, Word will display if the shortcut is currently assigned to another command. If it is, you may want to choose another combination to avoid conflicts. i. Once you have settled on an available shortcut, click ‘Assign’ to finalize your custom shortcut. j. Click ‘Close’ to exit the ‘Customize Keyboard’ dialog and then ‘Close’ again to exit the Symbol window.
- Now, whenever you need to type the “” character, simply use your custom shortcut by pressing the keys you assigned. The “” should appear in your document instantly.
Summary
Using shortcuts in word processors like Microsoft Word can greatly simplify the process of typing special characters. This approach can save you time, especially if you are working with languages or subjects that frequently use characters like “”. The primary benefit is efficiency; however, a potential downside is that you need to remember the shortcuts you set up. Moreover, if you use multiple computers or collaborate with others, they may not have access to the shortcuts you’ve created. Overall, employing shortcuts can be a powerful method to enhance your typing workflow and ensure that you are able to type special characters with ease.
Solution 9: Using a Mobile Device
Introduction
In our digital age, smartphones and tablets have become integral to our everyday communication. Many people now find themselves typing on mobile devices more frequently than on traditional keyboards. Fortunately, mobile device software is designed with ease of use in mind, and this includes typing special characters like the ” symbol (assuming you meant to represent a character such as “” or “ń”). On most mobile devices, these characters can be accessed with simple long-press actions on the virtual keyboard. This method is universally applicable across various operating systems, including iOS and Android, which dominate the mobile market. The steps outlined below will help users type the special ‘n’ characters easily.
Steps
Here is a step-by-step guide on how to type the ‘n’ with various accents on a mobile device:
- Access the Virtual Keyboard: Open any application on your mobile device that allows you to type text. This could be your messaging app, email app, notes, or any other text field.
- Locate the Basic ‘n’ Key: On the virtual keyboard that appears, locate the ‘n’ key. It’s usually found in the second row from the bottom.
- Long-Press the ‘n’ Key: Tap and hold down on the ‘n’ key. After a moment, a pop-up will appear showing various characters related to the letter ‘n’, including but not limited to ”, ‘ń’, ”, etc.
- Select the Desired Character: Slide your finger over to the specific version of the ‘n’ you wish to use, making sure it’s highlighted or slightly enlarged, depending on your device’s interface.
- Release to Type: Let go of the screen, and the highlighted character will be inserted into the text.
- Continue Typing: Proceed with typing the rest of your message or text. Repeat the above steps whenever you need to type another special ‘n’ character.
Summary
Using a mobile device to type special ‘n’ characters is highly beneficial because it’s a fast and efficient process that doesn’t require memorizing codes or navigating through additional menus. This method allows for quick adaptation in our fast-paced, mobile-centric world and ensures that even those without technical prowess can communicate in languages that use these special characters.
There are a few potential downsides to consider, however. For instance, the long-press method might not be immediately obvious to new smartphone users or those transitioning from physical to virtual keyboards. Moreover, the pop-up with the extra characters can sometimes be small, making precise selection difficult for individuals with large fingers or less dexterity. Lastly, the availability and appearance of special characters can vary between different mobile operating systems and even between different versions of the same operating system.
Despite these downsides, the convenience and simplicity make typing special ‘n’ characters on a mobile device a preferred method for many. With a bit of practice, users can quickly become adept at typing all sorts of special characters with just a few taps.
Solution 10: Using Voice-to-Text Features
Introduction
In today’s digital age, accessibility and ease of use are at the forefront of technological innovation, and Voice-to-Text Features stand as a testament to this progression. Voice-to-Text Features, also known as speech-to-text or voice recognition, allow users to speak to their devices and have their spoken words converted into text. This is an incredibly convenient way to type without physically using a keyboard, which includes typing special characters like the letter ”. This function can be particularly useful for individuals with physical disabilities, those who are multitasking, or anyone who prefers speaking over typing. In this section, we will explore how to utilize voice-to-text technology to type the letter ”.
Steps
- Activate Voice-to-Text Feature:
- On a Windows PC, press ‘Windows Key + H’ to activate the dictation feature.
- On a Mac, press ‘Fn (Function) key’ twice or use the key combination ‘Command + Control + Space’ to show the Emoji & Symbols viewer, then enable dictation in the system preferences.
- For mobile devices, simply tap the microphone icon on the on-screen keyboard.
- Ensure Correct Settings:
- Make sure your device’s microphone is on and functioning properly.
- Verify that the language settings are appropriate for the voice recognition to understand the pronunciation of ”, as this might differ with accents and dialects.
- Position Yourself Properly:
- Position yourself close enough to the microphone so that the device can easily pick up your voice.
- Speak Clearly:
- Begin to speak clearly and at a moderate pace. Pronounce the letter ” distinctly. In English, you might pronounce it as “en-yay”. Ensure there is as little background noise as possible to avoid errors.
- Punctuate Your Sentences (If Necessary):
- Say “comma”, “period”, “exclamation mark”, etc., as needed to ensure proper punctuation in your typed text.
- Edit as Needed:
- After you have finished dictating, review the text to ensure accuracy. Voice recognition is advanced but not perfect, so manual edits may be necessary.
- Practice:
- The more you use voice-to-text, the better it will understand your voice and nuances, thereby improving accuracy over time.
Summary
The Voice-to-Text feature is a powerful tool that offers a hands-free method of typing, making it especially beneficial for those who have difficulties typing traditionally. It allows for a faster way to communicate and create documents for those who can speak faster than they can type. Another advantage is that it supports multiple languages and dialects, which can help with typing special characters like ”.
One potential downside is that voice-to-text may not always be 100% accurate, especially with background noise or unclear pronunciations, and may require additional manual editing. Voice recognition can also struggle with homonyms – words that are pronounced the same but have different meanings or spellings, which might require context-specific clarification. Therefore, while voice-to-text offers convenience and accessibility, it’s still crucial to proofread and make necessary corrections to ensure the intended text is accurately captured.
Conclusion:
Typing the letter “n” on the keyboard is a basic yet essential skill for effective digital communication. By understanding and applying the simple steps outlined earlier, users can quickly and easily type this common character. Whether utilising the shift key for uppercase “N,” engaging with alternate keyboard layouts, or inserting special “ñ” characters, the process is straightforward once familiar. This guide aims to empower even the most novice typists to confidently produce the letter “n” in their daily computer use. Continue honing your typing skills, and remember that practice is key to increasing speed and accuracy.
FAQs:
- How do I type a capital “N”?
To type a capital “N,” hold down the Shift key and press the “n” key simultaneously. - What do I do if I want to type the “ñ” character on an English keyboard?
On a Windows computer, hold down the “Alt” key and type “0241” on the numeric keypad. For Mac, press “Option” + “n,” then release and press “n” again. - Can I change the key for typing “n” to something else?
Yes, you can use keyboard remapping software to change the function of keys, so a different key could be used to type “n.” However, this can lead to confusion and is not generally recommended for users who are not familiar with customized keyboard setups.


