Welcome to our practical guide on how to unblock websites on a school Chromebook. With the educational institutions”need to ensure a safe and distraction-free learning environment, certain websites are often restricted on school devices. However, there may be legitimate academic reasons to access some of these blocked sites for research or educational resources. In this guide, we’ll explore some straightforward and responsible methods to navigate these restrictions so you can make the most of your Chromebook for educational purposes. Please remember to adhere to your school’s policies and use these instructions ethically and appropriately.
Solution 1: Use a VPN Service
Introduction
A Virtual Private Network, or VPN, is a tool that provides a secure tunnel for your internet traffic, encrypting your data and masking your online activities. This secure tunnel connects your Chromebook to an external server located in a different geographical location. By using a VPN, you can effectively disguise your online identity and make it appear as though you are accessing the internet from a different place. This can be valuable for bypassing internet restrictions, such as the ones you might find on a school Chromebook.
VPNs are popular among users who desire both privacy and freedom online. They work on the principle of rerouting your connection through servers owned by the VPN provider, thus bypassing local network filters and firewalls. However, it should be emphasized that while VPNs can be used for legitimate purposes like privacy protection or accessing geo-blocked educational content, their misuse could lead to violations of school policies.
Steps
To use a VPN service on your school Chromebook, follow these steps:
- Choosing a VPN Service:
- Research and select a VPN provider that is trustworthy and has good reviews. It’s crucial to choose a service known for its security and reliability.
- Make sure the VPN service has servers in multiple countries, which offers more options to bypass restrictions.
- Check if the VPN provider offers a Chromebook compatible app or extension if your school Chromebook allows for installations.
- Setting Up the VPN:
- Sign up for the VPN service, usually via the provider’s website, and create your own account.
- Install the VPN application or extension on your Chromebook, if permitted, following the provider’s instructions.
- For Chromebooks that don’t permit installations, look if your VPN allows for manual configurations through Chrome OS’s built-in VPN support.
- Connecting to a VPN Server:
- Open the VPN application or navigate to the settings if it’s a manual setup.
- Log in using your VPN account credentials.
- Connect to a VPN server of your choice – typically, you would select a server in a country or region closest to you for better speed, unless there is specific content you’re trying to access that is available in a different region.
- Wait for the connection to establish. This is usually indicated by a visible change in the application or a notification.
- Accessing the Blocked Websites:
- Once connected, try visiting the websites that were previously blocked.
- The sites should now load, as the Chromebook is using the VPN’s encrypted connection, bypassing the school’s restrictions.
- Remember to disconnect from the VPN once you are finished, as remaining connected can potentially slow down your internet speed or consume more power.
Summary
Using a VPN service can provide multiple benefits, including the ability to unblock restricted websites, increased privacy, and the security of your internet browsing on a school Chromebook. However, it’s essential to recognize the potential downsides. VPN services might not always be free, and choosing a reputable provider that protects your privacy is crucial. Additionally, bypassing network restrictions goes against most school policies. There could be consequences if you’re caught using a VPN, ranging from temporary network access suspension to disciplinary actions. Always consider the rules and regulations set forth by your educational institution and weigh the necessity and risks associated with using a VPN service.
Solution 2: Try a Proxy Website
Introduction
A proxy website is a tool that acts as a gateway or a middleman between your device and the internet. When you can’t access a website directly due to restrictions—like the ones on a school Chromebook—a proxy website can help. It fetches the content you’re trying to access and displays it to you without you ever directly connecting to the site. This works because the proxy server is the one visiting the site on your behalf, bypassing the restriction that was preventing you from viewing the site directly. For non-technical readers, you can think of a proxy server as a helpful friend who can pass notes to someone you’re not allowed to talk to directly.
Steps
- Find a Proxy Website: Use the Chromebook’s browser to search for proxy websites. You might have to try multiple options since some proxies could also be blocked by your school’s internet filter.
- Navigate to the Proxy Site: Once you find a proxy site that isn’t blocked, open it. These sites typically have a simple webpage with a text box where you can enter URLs.
- Enter the URL of the Blocked Website: In the text box provided, type in the exact URL of the website you want to unblock.
- Browse Through the Proxy: After entering the URL, hit the Go, Browse, or equivalent button on the proxy website. The proxy will now connect to the website on your behalf and display its content in your browser window. It may look a little different than it normally does because the proxy is rendering the page for you.
- Use the Website: You should now be able to interact with the website as if you were visiting it directly. Keep in mind that because the proxy server is fetching the information for you, the loading times could be slower.
- End Your Session: When you’re finished, it’s a good idea to close the tab or window of the proxy website. If there’s an option to “end session” on the proxy site, use it to ensure that your session is closed for privacy reasons.
Summary
Utilizing a proxy website is a straightforward way to unblock websites on a restricted network, such as your school’s Chromebook. It’s user-friendly enough that it typically requires no technical expertise, making it accessible to virtually anyone. The primary benefit is its simplicity and the capability to bypass website blocks without having to install any software or make any system changes.
However, there are potential downsides to this solution. Proxy servers can sometimes be unstable or slow, and unless the proxy website uses HTTPS, it may not be secure, potentially exposing your information to third parties. Also, schools generally implement blocks for a reason, and circumventing them could violate school policies or terms of use, potentially leading to disciplinary action. Always proceed with caution and seek approval from your school’s IT department where possible.
Solution 3: Use a Portable Browser
Introduction
A portable browser is a standalone version of a web browser that can be run from a USB flash drive without needing to be installed on the computer it’s being used on. The advantage of using a portable browser on a school Chromebook is that it may not be subject to the same restrictions and monitoring as the pre-installed browser on the system, thus potentially allowing access to websites that are otherwise blocked.
Steps
- Acquire a USB Flash Drive: Obtain a USB flash drive with adequate space for the portable browser. It doesn’t need to be large; even a 4GB drive should suffice.
- Find a Portable Browser: Use a computer that isn’t restricted to download a portable browser. Two popular portable browsers are Portable Firefox and Portable Google Chrome. Simply search for the one you prefer followed by the word “portable”.
- Download the Portable Browser: Visit the official web page of the portable browser and download the version that is compatible with the operating system of your Chromebook (likely a Linux version).
- Install the Browser on Your USB Drive: Follow the instructions provided on the portable browser’s website to install it onto your USB drive. Typically, it is a straightforward process of extracting the downloaded file onto the drive.
- Safely Eject the USB Drive: Once the browser has been installed, ensure to safely eject the USB drive from the computer to prevent any data corruption.
- Insert the USB Drive into the Chromebook: Plug the USB drive with the portable browser into an available USB port on the Chromebook.
- Run the Portable Browser: Open your Chromebook’s file manager and navigate to the USB drive. Find the executable file for the browser, it should have an icon that looks like the browser you chose, and double-click it to run.
- Browse to Your Desired Websites: If all goes well, you should be able to use the portable browser like any other browser, typing in URLs or using a search engine to find your desired information or website.
Summary
The benefits of using a portable browser are that it could circumvent network-based restrictions put in place on a school’s Chromebook by essentially running a separate browser instance that doesn’t adhere to the Chromebook’s installed settings.
However, there are potential downsides to this approach. Most notably, schools often have strict policies regarding circumvention of their network restrictions, and using a portable browser could be considered a violation of these policies. Furthermore, because the portable browser isn’t managed by the school’s IT infrastructure, it may lack security features that protect users from malware and other online threats. Additionally, the school’s administration might track USB activity, and you could get into trouble for attempting to bypass restrictions.
Lastly, it’s important to remember that schools impose these restrictions for a reason, often to keep students safe and focused on educational content. Before attempting to use a portable browser or any other method to bypass internet restrictions, it’s strongly advised to consult with the school’s IT department or review the school’s policies regarding acceptable use of technology.
Solution 4: Utilize Google Translate as a Proxy
Introduction
Imagine you’re in a foreign country, and you receive a letter in a language you don’t understand. You seek the help of a local to translate the letter for you. Now, this is essentially what Google Translate can do for websites, with an interesting twist. It can act as a middleman, or a ‘proxy’, translating the website content, and because it’s Google Translate accessing the website, not directly you, it might bypass restrictions that are in place by your school network.
Steps
- Open Google Translate: Go to the Google Translate website by typing
translate.google.comin your Chromebook’s browser address bar. - Enter Website URL: Instead of entering text to translate, type or paste the URL of the website you wish to access in the text box on the left side of Google Translate.
- Select Languages: By default, Google Translate might be set to translate from English to another language. You need to reverse this because your goal is to keep the website in English (or your preferred language). So, set the language on the left (the ‘from’ language) to a language other than English, and then set the language on the right (the ‘to’ language) to English.
- Translate and Navigate: Click the ‘Translate”button. Google Translate will now attempt to translate the website. However, since most websites you’re trying to access will already be in English, Google will effectively just act as a conduit to the site. Click on the link in the translated section, which should take you to the intended website.
- Browse the Site Through Google Translate: You should be able to browse the website within the Google Translate interface. Note that some elements of the website may not function perfectly because you’re viewing a ‘translated’ version of the site.
Summary
The benefit of using Google Translate as a proxy is its simplicity and the fact that it doesn’t require any additional software or changes to your Chromebook settings. It can be a quick and handy solution when you’re in a pinch and need to access information for legitimate educational purposes.
However, there are downsides. Firstly, the website functionality may be limited ”interactive elements may not work, and formatting might be off. Secondly, and more importantly, using this method might be against your school’s internet usage policies. It’s a clever workaround, but you could get in trouble for using it. Always try to follow the rules set by your educational institution and use such methods only for positive, educational purposes, and with the right permissions.
Solution 5: Use a Different DNS Server
Introduction
The Domain Name System, or DNS, is like the phonebook of the internet. When you type a website address into your browser, your computer uses DNS to look up and find the correct server where that website’s content is stored. By default, your Chromebook uses the DNS servers provided by the school’s network, which may have restrictions on certain websites. By changing the DNS server to a different one, say a public DNS server like Google DNS or OpenDNS, you might be able to bypass these restrictions since the new DNS server might not block the same websites.
Remember that changing your DNS settings does not guarantee that you’ll be able to unblock every website, and your school’s network might have other layers of security to prevent access to certain sites. Additionally, some schools may have policies that restrict changing network settings, so you should make sure you’re not violating any rules or policies by changing your DNS settings.
Steps
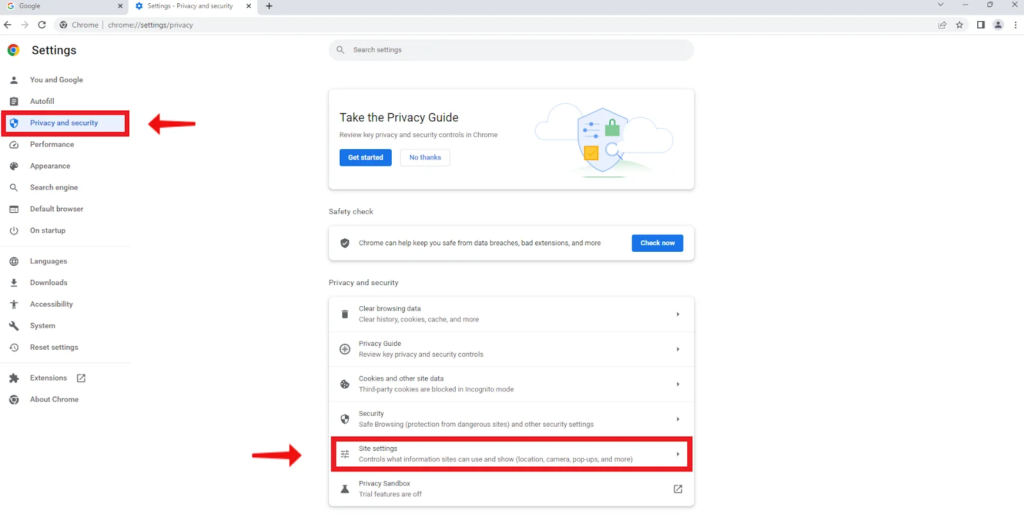
- Open the settings on your Chromebook by clicking on the time in the bottom-right corner and then clicking the gear icon.
- In the settings menu, look for ‘Wi-Fi’ and click on it.
- Find your school’s Wi-Fi network in the list and click on it.
- Look for the network options and find the section for DNS settings. This might be under an ‘Advanced’ or ‘Network’ section.
- Change the two DNS entries to the addresses of a public DNS service. For example, for Google DNS, you would input 8.8.8.8 for the primary server and 8.8.4.4 for the secondary server. For OpenDNS, you would use 208.67.222.222 and 208.67.220.220.
- Save your settings and try accessing the previously blocked website again.
It’s possible that you will need administrator rights to change these settings; if you’re prompted for a password and don’t have it, then you won’t be able to make these changes.
Summary
Using a different DNS can be a simple solution to access blocked content if the restrictions are DNS-level blocks. The benefits include that it’s easy to do, it’s reversible, and it can improve your overall browsing experience if the DNS server you’re switching to is faster or more reliable.
However, there are potential downsides. One, your online activity might be less private because your DNS queries are visible to the DNS server operator. Two, if the website is blocked on a more fundamental level than DNS, changing DNS servers won’t help. Lastly, bypassing internet filters set by your school could lead to disciplinary measures if discovered. Always use this method with caution and awareness of your school’s policies.
Solution Name
Try Extension-based Solutions
Introduction
In the context of browsing the internet, extensions can be powerful tools. Extensions are small software programs that customize your browsing experience. They enable users to tailor the Chrome browser’s functionality and behavior to individual needs or preferences. They are built on web technologies such as HTML, JavaScript, and CSS.
When it comes to unblocking websites on a school Chromebook, trying out extension-based solutions can sometimes be an effective approach. These extensions may include various tools that can proxy your traffic through other servers, bypass regional restrictions, or manage the way your browser accesses content.
However, on school Chromebooks, extensions are typically managed by the school’s IT administrator to ensure safety and prevent the misuse of devices. Consequently, this method might not always be available as your ability to add extensions may be blocked. If you’re permitted to add extensions, or if you’re using your school Chromebook under less strict policies, here’s how to proceed.
Steps
Before we start, this guide assumes that you have the necessary permissions to install extensions on your school Chromebook:
- Open Chrome Browser: Begin by opening the Chrome browser on your Chromebook.
- Navigate to Chrome Web Store: Go to the Chrome Web Store by typing “chrome.google.com/webstore” into the URL bar, and press “Enter.”
- Search for an Unblock Extension: In the Web Store, use the search bar to look for extensions that are designed to unblock websites. Keywords like “unblock,” “proxy,” and “VPN” might be helpful.
- Choose an Extension: Evaluate the available extensions. Look for ones with high ratings and positive reviews to increase the chances that they’re both effective and safe to use.
- Install the Extension: Click on the extension you want to use, then press the “Add to Chrome” button. Some extensions might require you to accept certain permissions. Review these permissions carefully before proceeding.
- Set Up the Extension: Once installed, an icon for the extension will typically appear near the top-right corner of the browser. Click this icon and follow any setup instructions provided by the extension. This might include creating an account, configuring proxy settings, or specifying which websites you want to unblock.
- Use the Extension: With the extension configured, you should be able to navigate to the previously blocked website. The extension may route your traffic through a server in a location where the website is not restricted, thereby granting access.
- Manage the Extension: If you’re done using the website, you can disable the extension by clicking on its icon and usually selecting a ‘turn off’ or ‘pause’ option. This is recommended to not unnecessarily route traffic through a proxy.
Summary
Extension-based solutions for unblocking websites on a Chromebook can be quite straightforward and user-friendly for non-technical individuals. They have the benefit of being easy to install and often just a click away from being activated or deactivated.
However, there are potential downsides to consider. First, school Chromebooks are often configured to prevent the installation of non-approved extensions. Second, using such extensions might violate school policies, and you could face disciplinary action if caught. Lastly, some extensions can pose privacy and security risks, especially if they are not from reputable providers.
If permitted, using extensions is a temporary and often effective course of action for bypassing internet restrictions, but it should be done thoughtfully, with consideration for privacy, security, and compliance with school regulations. Always consult with your school’s IT department or relevant authority before attempting to change the configuration of your school-issued Chromebook.
Solution 7: Using Mobile Data (Hotspot)
Introduction
Accessing the internet through your personal mobile data via a hotspot can be an effective way to bypass the network restrictions imposed by your school’s Wi-Fi. When you connect your Chromebook to a mobile hotspot, you’re essentially using your phone’s cellular data to access the internet. This method is simple and does not involve any complex technical procedures, which makes it a good option for those without much technical knowledge.
Steps
- Check Data Plan: Before starting, ensure that your mobile phone’s data plan allows for hotspot usage and that you have enough data available. Keep in mind that browsing data-intensive websites or streaming video can consume a lot of data quickly.
- Set up Hotspot on Your Mobile Device:
- Go to the “Settings” on your smartphone.
- Find and select the “Mobile Hotspot” or “Tethering” option (this varies by device and operating system).
- Set up the hotspot by creating a network name (SSID) and a password (make sure it’s secure).
- Activate the Mobile Hotspot:
- Turn on the mobile hotspot feature on your smartphone.
- Wait a few moments for the network to start up and become discoverable.
- Connect the Chromebook to the Hotspot:
- On your Chromebook, click on the network icon located at the bottom right corner of the screen.
- Look for the network name (SSID) you created for your mobile hotspot.
- Click on the network and enter the password you set up when prompted.
- Verify Connection:
- After connecting to the hotspot, you should see an indication that you’re connected to the internet on your Chromebook.
- Open the browser and try accessing the website that was previously blocked. If the hotspot is working correctly, you should be able to reach the site.
- Monitor Mobile Data Usage:
- Keep an eye on your mobile data usage to avoid unexpected charges on your phone bill.
- If necessary, set up data usage alerts on your mobile phone to warn you when you’re nearing your data cap.
Summary
Benefits: Using a mobile hotspot is a straightforward way to get around school network restrictions. It doesn’t require any modifications to the Chromebook, making it a non-invasive method to access blocked content. It’s also relatively quick to set up and doesn’t require technical expertise.
Potential Downsides: This method depends on your mobile data plan, which may incur additional charges if you have a limited amount of data. Furthermore, the network speed is usually slower than Wi-Fi, which might affect browsing speeds and the ability to stream or download large files. Lastly, not all Chromebooks may have the capability to connect to mobile hotspots, depending on their network hardware and permissions set by school administrators. Always ensure that you’re not breaching any school policies or agreements while using your personal data for educational purposes.
Solution 8: Reset the Chromebook
Introduction
When you reset a Chromebook, you’re essentially performing a factory reset, which returns the device to its original state when it was first purchased. This means that all user accounts, including any managed profiles such as those set up by schools, along with their corresponding data and settings, will be erased. It gives you a fresh start with the Chromebook, free from any configurations that may have been restricting access to certain websites.
However, it is crucial to understand that this method can have serious implications. If the device is not personally owned and is instead provided by the school, a factory reset may violate school policies and can lead to consequences. Additionally, you may lose access to your educational resources and files if they are not backed up elsewhere. It is always recommended to discuss any adjustments with your school’s IT department prior to taking action.
Steps
- Backup Your Files: Before proceeding, make sure to backup any important files to Google Drive or an external storage device, as the reset will delete all data on the Chromebook.
- Sign Out of the Chromebook: Make sure you’re signed out. To do this, click on your account photo and then the ‘Sign out’ option.
- Enter Recovery Mode:
- Turn off the Chromebook.
- Press and hold the
Esc+Refresh(typically the 4th key on the top row of the keyboard) buttons, then press thePowerbutton. Keep holdingEsc+Refreshuntil the Chromebook starts up and you see the recovery message.
- Trigger Powerwash:
- On the recovery screen that appears, press
Ctrl+D. You’ll see a message stating that “OS verification is off.” - Press
Enterto turn OS verification on, and the Chromebook will prompt you to press theSpacebar to re-enable it. - Press the
Spacebar, then pressEnteragain to confirm your choice. The Chromebook will restart and begin the Powerwash process.
- On the recovery screen that appears, press
- Set Up Your Chromebook Again (optional):
- Once the reset process is complete, you’ll see a welcome screen where you can set up the Chromebook as new.
- You’ll need to connect to a Wi-Fi network, accept the terms of service, and sign in with a Google Account. Note that signing in with a school-provided account might automatically re-enforce the same restrictions you were trying to circumvent.
Summary
By resetting the Chromebook, you might effectively unblock restricted websites by removing any configurations set by the school. This can be particularly useful if the restrictions are overly blocking access to useful educational materials, or you’ve graduated and would like to use the Chromebook without restrictions.
However, the downsides can range from potential violation of school policies to the loss of all local data. It’s a method that should be applied with consideration and typically as a last resort. Moreover, if the Chromebook is managed by the school, there is a strong possibility that the educational institution’s IT systems will automatically reapply the restrictions once you log back in with your school account. It’s advisable to only use this method if you have full ownership over the Chromebook or have obtained explicit permission from your school’s IT department.
Solution Name: Use an SSH Tunnel
Introduction
An SSH tunnel, in simple terms, is like a secure and secret passage through which your internet traffic can travel. SSH stands for Secure Shell, which is a network protocol that provides a secure way to access a network computer over an unsecured network, such as the internet. By using an SSH tunnel, you create a protected path for your browsing data, which can help to get around website blocks on your Chromebook set up by your school. However, setting up an SSH tunnel is a bit more advanced than some other methods, and you’ll need an external server with SSH access to achieve it. Keep in mind that this might not comply with your school’s acceptable use policy, so always have permission before proceeding.
Steps
- Find an SSH Server: The first step is to have access to an SSH server. You might have your own server, use a web hosting service that offers SSH access, or ask a tech-savvy friend to give you SSH access to their server.
- Gather Your SSH Credentials: Once you have an SSH server to connect to, you will need the server’s IP address, as well as your username and password on that server.
- Enable Linux (Beta) on Your Chromebook: You need to turn on the Linux feature on your Chromebook.
- Open the Chromebook settings.
- Click on “Advanced” on the left panel to expand the menu.
- Click on “Developers.”
- Choose “Linux development environment (Beta)” and click on the “Turn on” button.
- Open the Linux Terminal: After Linux is set up, open the Linux terminal from your app drawer.
- Install the SSH Client: Enter the command
sudo apt-get install openssh-clientto install an SSH client on your Linux environment (If it is not already installed). - Initiate the SSH Tunnel: Type the command
ssh -D 1080 -C -q -N [username]@[SSH server's IP address]and press Enter. Replace [username] with your username and [SSH server’s IP address] with your SSH server’s IP address. - Authenticate Your Connection: When prompted, enter your SSH password. Your encrypted SSH tunnel is now set up.
- Configure a SOCKS Proxy: In your Chrome browser, go to the settings and search for ‘proxy’. You’ll have to set up your proxy by specifying
SOCKS hostaslocalhostandPortas1080. - Start Browsing: Once everything is set up, you can start browsing. All your Chrome traffic will now go through the SSH tunnel.
Summary
Using an SSH tunnel to unblock websites on a school Chromebook is an effective and secure method. It has the benefit of encrypting your data, which means prying eyes can’t easily see what websites you are visiting. Also, because the SSH connection is a recognized standard for secure communication, it is less likely to be blocked than some other methods, like simple proxies.
One potential downside is the complexity of setting it up, especially if you have no technical background or experience with Linux. Additionally, finding an SSH server might not be straightforward for everyone. Lastly, since this method is fairly technical, if done improperly, it might not work or could potentially disrupt your school’s internet settings or your Chromebook’s configuration.
Remember to always follow your school’s policies and guidelines regarding internet use, and ask for permission before attempting to use an SSH tunnel to unblock websites.
Solution Name: Access Cached Webpages
Introduction
Accessing cached webpages is a clever workaround to view content from websites that may be blocked by your school’s network. When you search for information online, search engines like Google take snapshots of web pages and store (or “cache”) these versions. These snapshots can be slightly outdated, as they might not reflect the most current version of the page, but they are generally useful when the original webpage is not accessible due to network restrictions. This solution is particularly handy because it doesn’t require any additional software or modifications to your Chromebook. Let’s walk through the steps to access these cached pages.
Steps
- Find a Search Engine: Open the web browser on your Chromebook and navigate to a search engine like Google.
- Search for the Website: Type the website’s name you wish to access in the search bar and press ‘Enter’ to perform a search.
- Locate the Cached Link: In the search results, find the webpage you’re trying to access. Look for a small downward-facing arrow or three dots next to the website’s URL or title in the results. This should bring up a menu with additional options.
- Access the Cached Page: In that menu, click on the “Cached” link. This will redirect you to the cached version of the webpage that’s stored on the search engine’s servers. Sometimes the word “Cached” may not be immediately visible, and you may need to click on sub-menus or other icons that indicate more options.
- Browse the Cached Page: You should now be viewing an older version of the site. While this method should work for many websites, some interactive features might not function because you’re viewing a saved snapshot, not the live page.
- Use Search Operators: If you can’t find the cache link directly, you can sometimes access the cached version by using Google’s search operators. Type “cache:” followed by the website’s address directly into the search bar, for instance: “cache:example.com”.
- Explore Other Pages: If you need to view other pages on the website, repeat the process for each page you want to access, as you’ll usually only access one cached page at a time.
Summary
Using cached webpages to bypass restrictions on your school Chromebook can be a quick and convenient way to access information without running afoul of network filters. This method is usually permissible because it uses legitimate features of search engines, and doesn’t require any technical breaches of network security protocols.
Benefits of this method include ease of use, accessibility, and the fact that it doesn’t require any technical modifications to your device. This can be particularly useful for educational research or when you need information from a website for a school project.
However, some potential downsides exist. The primary issue is that cached pages might not be up-to-date, and live features like forms and dynamic content won’t work through a cached snapshot. Also, some websites may not have cached versions available, especially if they are less popular or have requested not to be cached. Keep in mind that if a website is updated often, the information you access from a cached version may be outdated, which could be critical, depending on the context in which you need the information.
Conclusion
Navigating through the restrictions on a school Chromebook to access blocked websites can be a complex process, but with the methods provided, you have a few potential solutions to explore. Remember that circumventing these blocks should always be done with respect to school policies and for educational purposes. Maintaining digital responsibility is crucial. If you’re uncertain or need assistance, it’s best to consult with your school’s IT department. Stay informed, use technology wisely, and continue to explore the vast resources available online within the appropriate guidelines.
FAQs
Q: Why are websites blocked on a school Chromebook?
A: Websites might be blocked on a school Chromebook to ensure that students are focused on educational content, to protect students from inappropriate material, and to comply with educational regulations or guidelines.
Q: Can unblocking websites on a school Chromebook get me in trouble?
A: Yes, it can. Circumventing your school’s content filters may violate school policy or even local laws. It’s important to understand the consequences and ensure that you are not breaking any rules when attempting to access blocked websites.
Q: Are there legal ways to unblock websites on a school Chromebook?
A: The best legal way to access a blocked website is to talk to a teacher or IT administrator. If the website is educational and not against school policy, they might unblock it for you. Always seek permission before attempting to bypass any restrictions.